When I first learned how to focus stack, I started doing it for just about every photograph I took. The process was surprisingly simple, and I became a little obsessed with the results.
Looking back, though, most of those photographs didn’t need it. One shot would have been enough. I was creating extra work for myself in the field and again at the computer.
The question I hear at nearly every workshop and conference is this: How do you know when you actually need to focus stack? The answer starts with checking the right parts of your image before you leave the location. Once you know what to look for, you can save the extra frames and processing for photographs that genuinely benefit from them.
Key Takeaways
- Check important foreground and background details on location before deciding whether to focus stack.
- Close foreground subjects and long focal lengths can make a single exposure’s depth of field insufficient.
- Keep camera settings and framing consistent while moving focus through the scene.
- Synchronize edits in Lightroom, then align and blend the frames as layers in Photoshop.
Table of Contents
- When Does a Photograph Need Focus Stacking?
- The Best Field Check: Inspect Away From Your Focus Point
- Don’t Forget About Telephoto Landscapes
- How to Capture a Focus Stacking Series
- Edit One Frame, Then Synchronize in Lightroom
- How to Focus Stack in Photoshop
- Sharp Enough Is a Creative Decision
When Does a Photograph Need Focus Stacking?
Focus stacking combines photographs captured at different focus distances into one image. Each frame contributes its sharp areas, giving the finished photograph more depth of field than any individual frame could provide.
That sounds useful for almost any landscape. But having a foreground, midground, and distant background does not automatically mean you need to stack.
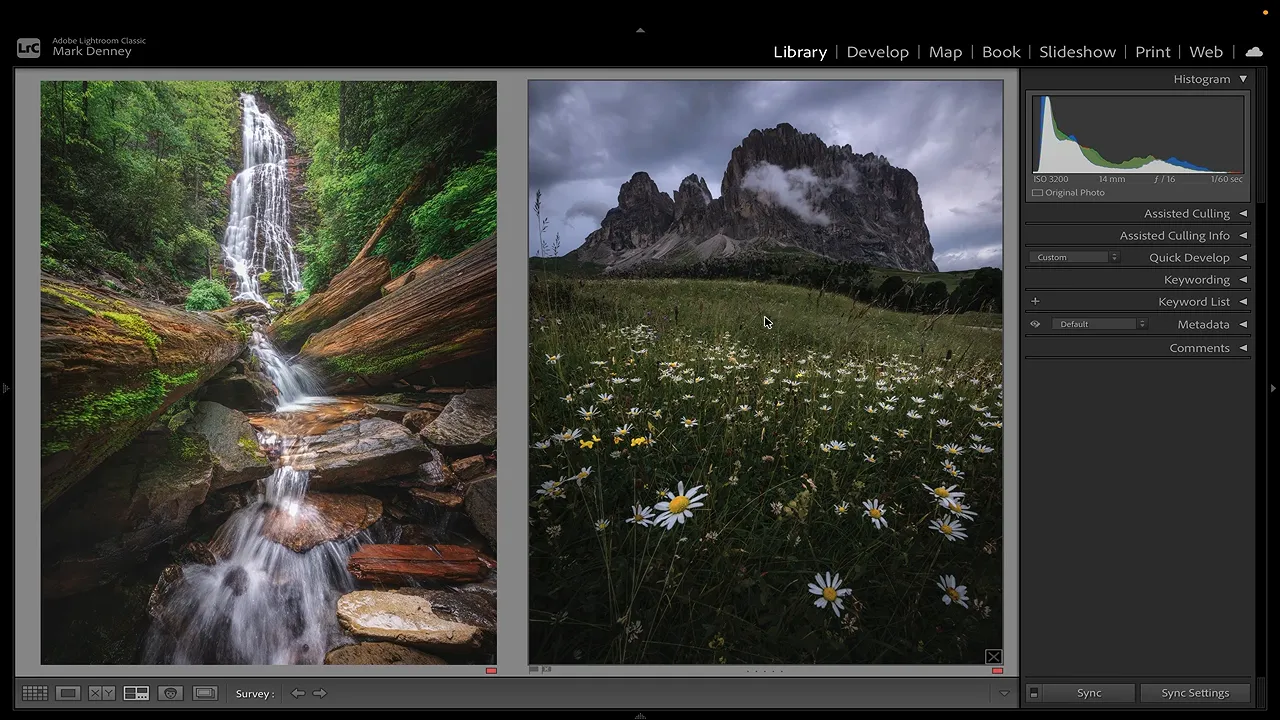
A Waterfall That Needed Only One Shot
One of my waterfall photographs has rocks close to the camera and a waterfall much farther away. At first glance, it looks like exactly the kind of composition that might require focus stacking.
But inspecting the photograph tells a different story. The middle of the scene is sharp. The foreground rocks are sharp. The distant waterfall is sharp, too.
There is nothing for a focus stack to fix. A single exposure already delivers the foreground-to-background sharpness I want.
That distinction matters: judge the actual sharpness in the photograph, not how much depth the composition appears to have.
A Mountain Scene That Did Need Stacking
A photograph of wildflowers beneath the mountains in the Dolomites presented a different problem. With focus set farther into the scene, the midground and mountains looked sharp, but the nearest flowers were noticeably soft.
Moving focus onto those flowers solved the foreground problem. The petals and nearby detail became beautifully sharp. Unfortunately, the midground and mountains were now soft.
Focusing deeper into the scene brought the middle and distant areas back into focus, but the closest flowers went soft again.
I was already at f/16, yet no single focus position gave me sharp flowers, a sharp midground, and sharp mountains together. Those nearest flowers were only about 12 inches from the front of my lens. That close foreground made the difference.
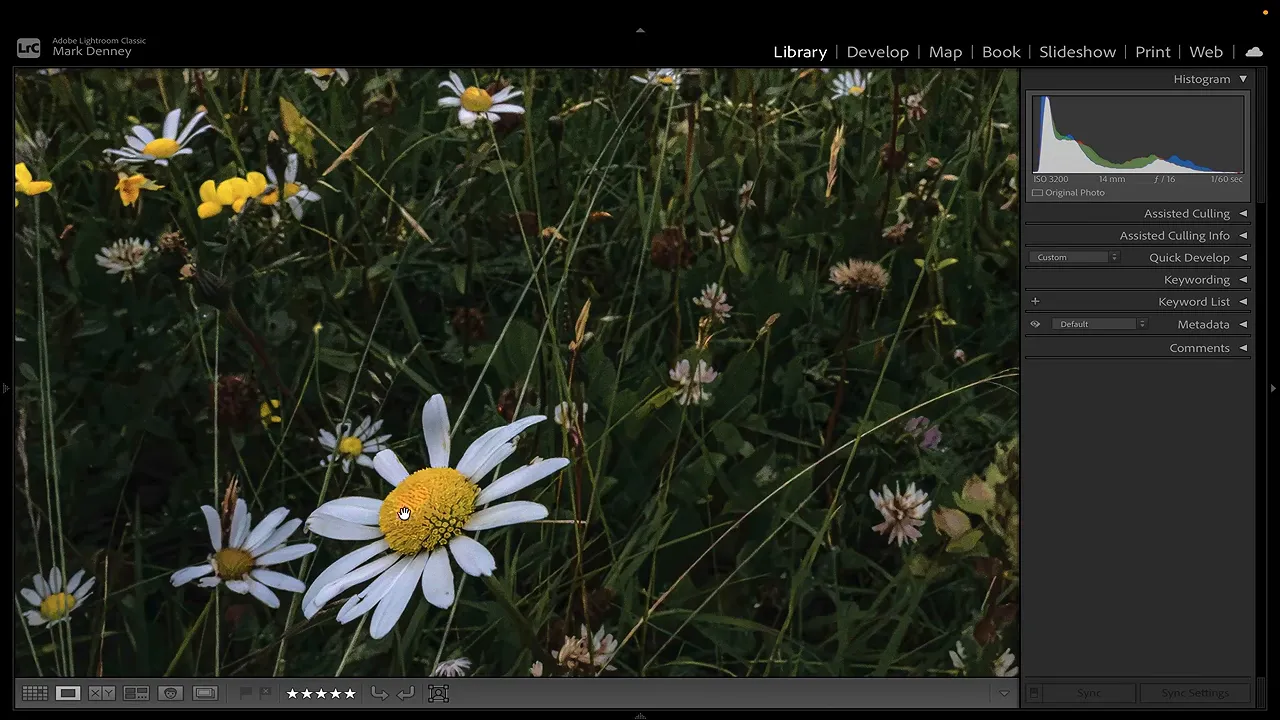
This is where focus stacking earns its place. Different frames contain the sharp detail I need, and blending them allows me to bring that detail together.
The Best Field Check: Inspect Away From Your Focus Point
The most important habit is to review your photographs on the back of the camera while you are still on location.
Don’t spend the entire review checking the spot where you focused. Assuming focus landed correctly, that is the area most likely to be sharp. The useful information is elsewhere.
- Capture your photograph with your intended composition, aperture, and focus position.
- Magnify the nearest important detail. Check whether the foreground has the sharpness you want.
- Inspect the distant background. Look at detail well beyond your focus point.
- Check the midground when needed. Make sure important areas between the two extremes are also sharp enough.
- If an important area is soft, try another focus position. See whether one frame can cover the scene before committing to a stack.
For the waterfall photograph, I focused within the middle portion of the scene. During review, the useful checks were the distant waterfall and the nearby rocks. Both held up, so there was no reason to capture a series.
For the Dolomites photograph, changing focus simply moved the softness from one part of the scene to another. That told me I needed multiple frames to achieve my intended result.
Make this decision in the field, not at home. Discovering a soft foreground on your computer is frustrating when you no longer have the opportunity to capture the missing frame.
Don’t Forget About Telephoto Landscapes
Very close foreground subjects are not the only reason to focus stack. Long focal lengths can make depth of field much less forgiving, too.
In a Colorado photograph, I composed a line of aspens that gradually receded away from the camera. I was shooting at 400mm and f/11. The image looked fairly sharp at a normal display size, but magnifying it revealed the problem: the tree I focused on was sharp, while other trunks became progressively softer.
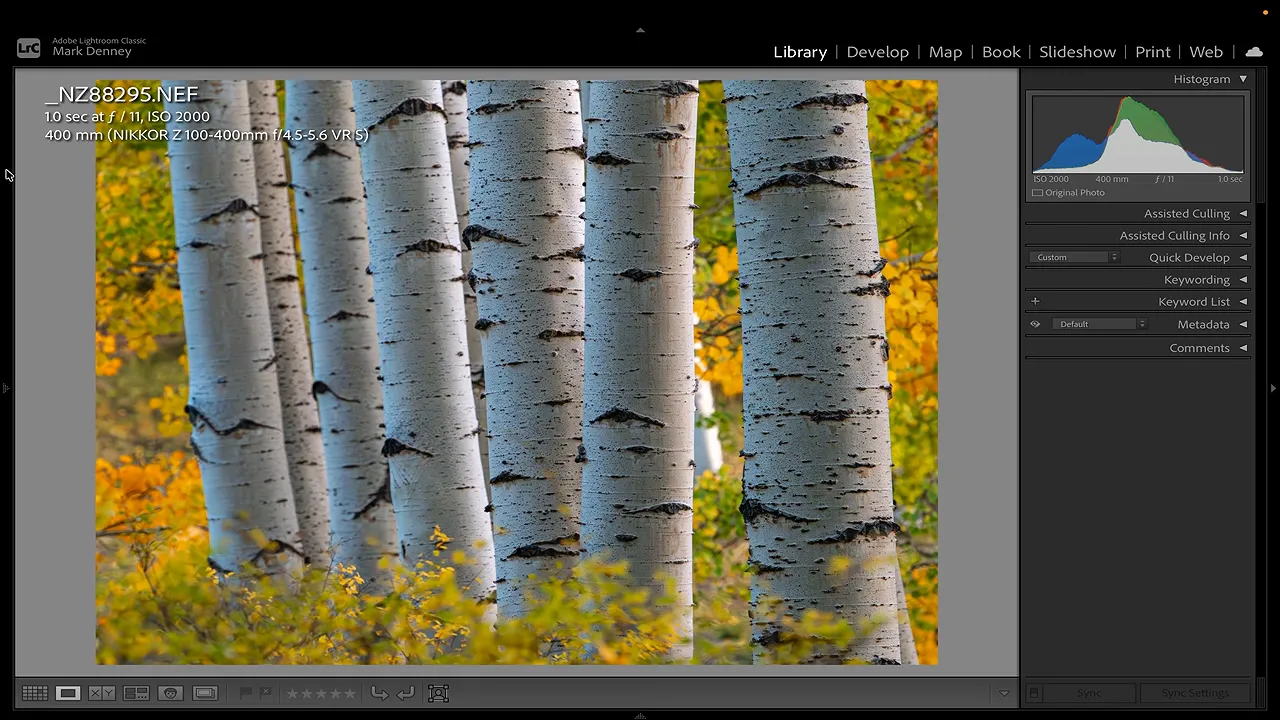
A wide-angle landscape at something like 14mm can be quite forgiving at f/11 or f/16, depending on the subject distances. In this 400mm composition, the available depth of field was much narrower.
So don’t assume focus stacking is only a wide-angle technique for flowers and mountains. A telephoto composition with subjects at different distances can benefit just as much. The same magnified field check will tell you whether it is necessary.
How to Capture a Focus Stacking Series
For the aspen photograph, I captured five frames, moving the focus point along the receding line of trees. Each photograph made a different part of the scene sharp.
The important thing is to change focus without changing everything else.
- Use a tripod. Keeping the camera stationary makes the eventual blend much more seamless.
- Keep the composition fixed. Don’t reframe between exposures.
- Keep aperture, shutter speed, and ISO unchanged. You want consistent frames throughout the series.
- Move focus through the important subject distances. In this case, I worked from tree to tree as the trunks receded.
Five photographs were what this particular scene needed, not a required number for every focus stack. The purpose is to capture sharp detail across the areas you intend to combine.
I have my Nikon Z8 configured so tapping the screen focuses and takes the photograph. That makes the capture process straightforward: tap one tree, then the next, then the next.
And yes, I sometimes make a little “boop” noise with each tap. Entirely optional. Keeping the camera settings consistent is not.
Edit One Frame, Then Synchronize in Lightroom
You don’t need to edit every image in the series individually. Edit one photograph first, then copy those adjustments across the others.
- Edit one frame from the focus stacking series in Lightroom Classic.
- Select the full series, making sure the edited photograph is the source for synchronization.
- Right-click the edited image and choose Develop Settings > Sync Settings.
- Select the settings you want to copy. For this series, I used Check All to copy the complete edit.
- Click Synchronize.
Once synchronization finishes, all five photographs have the same edited appearance. The meaningful difference between them is where focus was placed.
Magnifying and moving between frames makes that easy to see. A trunk that is sharp in one exposure becomes softer in another, while trees farther along the line become sharper.
Lightroom handles this preparation, but Lightroom itself does not blend the photographs into a focus stack. For that step, I use Photoshop. Dedicated software such as Helicon Focus is another option.
How to Focus Stack in Photoshop
The Photoshop portion is simpler than many people expect. The workflow is to open the photographs as layers, align them, and then blend their sharp areas.
1. Open the Photographs as Layers
With all the synchronized frames selected in Lightroom Classic, choose Photo > Edit In > Open as Layers in Photoshop.
Photoshop opens one document containing a separate layer for each photograph. My aspen series produces five layers.
2. Auto-Align the Layers
Select every image layer. You can click one end of the layer stack, hold Shift, and click the other end to select the full range.
Then choose Edit > Auto-Align Layers, leave the projection set to Auto, and click OK.
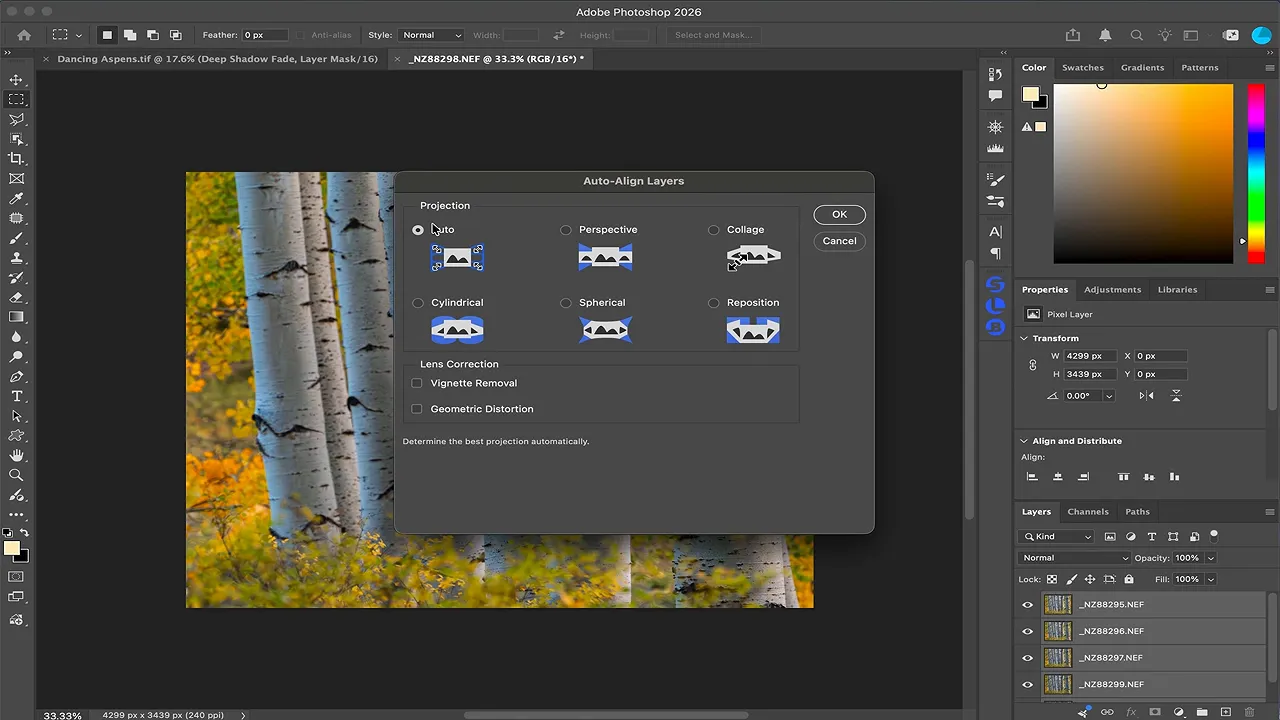
I do this even when I have used a tripod and nothing appears to have moved. Changing focus can cause slight changes in framing or magnification, often called focus breathing. Auto-Align helps compensate for those small differences so the frames fit together more accurately.
3. Auto-Blend Using Stack Images
Leave all the aligned layers selected and choose Edit > Auto-Blend Layers. Set the blend method to Stack Images, then click OK.
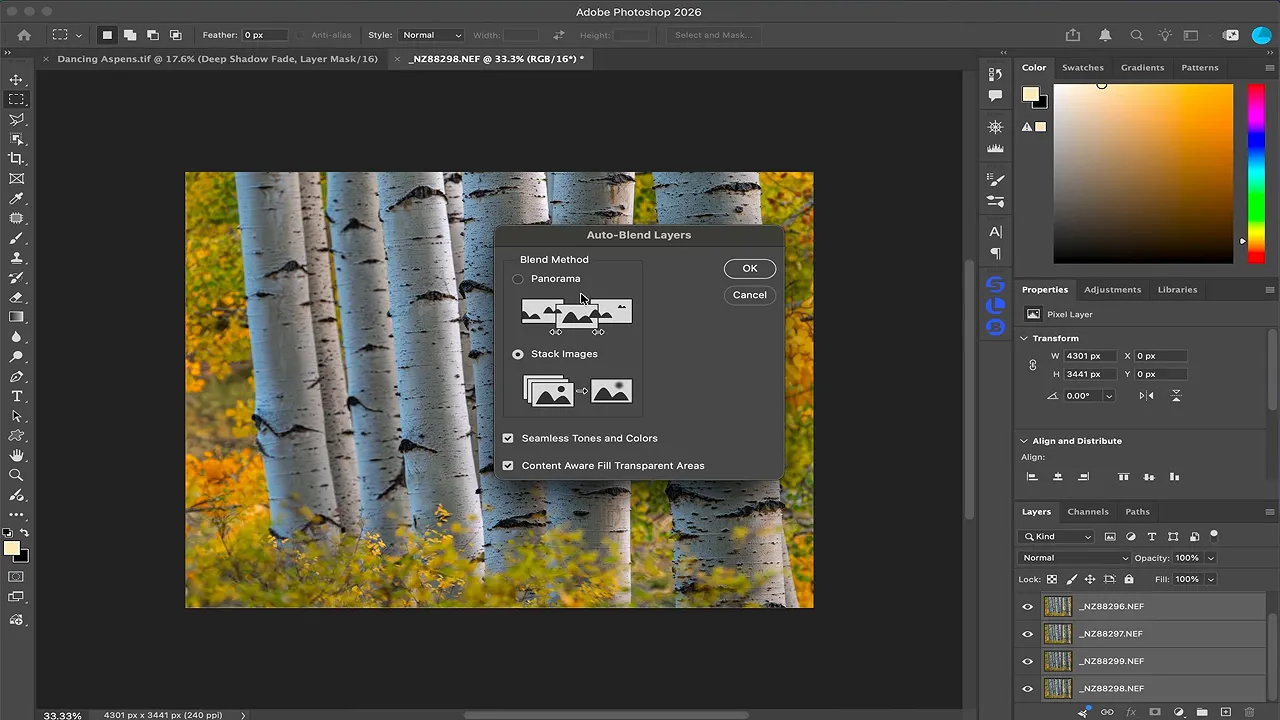
Photoshop evaluates the photographs, identifies their in-focus areas, and combines those portions into the blended result. Adobe’s Auto-Blend Layers documentation provides additional reference for the tool.
The generated layer masks show how the blend works:
- White areas reveal the portions used from that layer.
- Black areas hide the portions excluded from that layer.
In other words, Photoshop takes the sharp section from one photograph, another sharp section from the next, and continues combining them across the scene.
4. Inspect the Result and Merge
Magnify the finished blend and inspect it throughout the image. In the aspen photograph, the trunks that were soft in individual frames now hold sharp detail all the way along the line of trees.
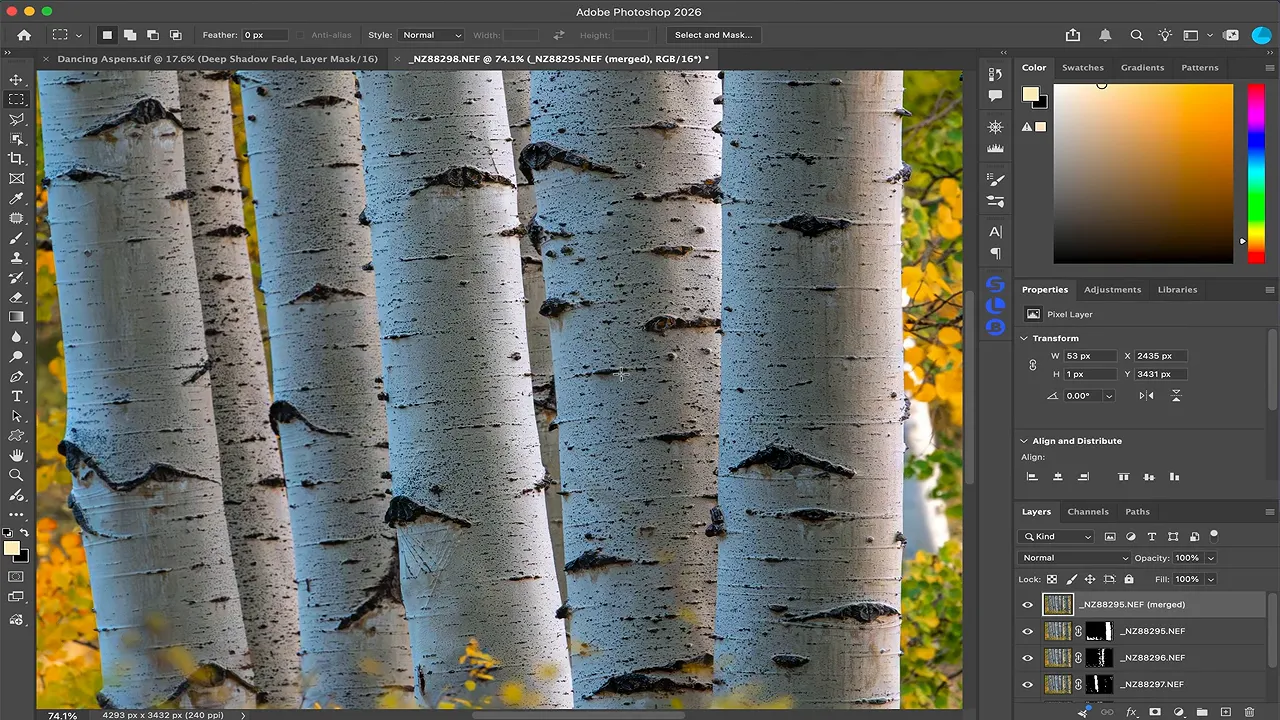
Once I am satisfied with the result, I select the layers, right-click, and choose Merge Layers. That gives me the combined file as a starting point for any further work.
Sharp Enough Is a Creative Decision
The ease of this process is a bit of a double-edged sword. Once I realized how simple focus stacking could be, I started doing it automatically instead of asking whether the photograph needed it.
From my experience, most of my landscape photographs don’t require a stack. And not every distant detail needs to be perfectly tack sharp for an image to work.
I am often perfectly happy with a sharp foreground and midground, even if the distant mountains are slightly softer. That gentle falloff can feel natural to me. Absolute sharpness from the nearest object to the horizon is an option, not an obligation.
Check the photograph, decide what needs to be sharp, and only stack when a single exposure cannot give you that result. You’ll spend less time making unnecessary frames and more time working intentionally, both in the field and in the digital darkroom.
If you’d like a reference to keep handy while trying this yourself, I put together a free focus stacking PDF guide.


