When I’m brushing an adjustment onto a tree trunk, I want to keep my attention on the tree. As the trunk gets narrower, I need a smaller brush. If the edge needs to blend more gently, I need more feathering. And when I want to check where the adjustment is going, I need to see the mask.
I can do all of that without moving over to the sliders.
That’s the real benefit of Lightroom Classic keyboard shortcuts. They aren’t just about editing faster. They help you spend less time navigating the interface and more time thinking about the photograph. And, honestly, once they become second nature, editing becomes a lot more fun.
These are the shortcuts I use most often in the Develop module, from creating local adjustments to reviewing a nearly finished image. My Colorado landscape photograph, with its curved aspen trunks and golden foliage, is a great example of how they fit together.
What You'll Learn
- Control brush size, feathering, and mask visibility without returning to Lightroom’s sliders.
- Open masking tools, cropping, white balance, and zoom directly with keyboard shortcuts.
- Use clipping warnings, Before/After comparisons, and Lights Out to evaluate your edits.
- Build a small set of familiar shortcuts instead of trying to memorize every command.
Table of Contents
- Control Your Brush Without Leaving the Photograph
- Jump Straight to Linear and Radial Gradients
- Reach the Everyday Editing Tools Faster
- Check Highlight and Shadow Clipping With J
- Review Where the Edit Started and Where It Is Now
- Learn the Shortcuts That Fit Your Workflow
Control Your Brush Without Leaving the Photograph
I love local adjustments, and I use a lot of masks. So anything that removes unnecessary steps from that process makes a noticeable difference in my workflow.
K: Open the Masking Brush
Creating a brush mask with the mouse can involve several steps: opening Masking, choosing Create New Mask, selecting Brush, and then moving back onto the image to paint.
Press K to jump straight to the Brush. Even if you’re working in the Basic panel, Lightroom opens the masking controls with the brush ready to use. You can go straight from deciding that an area needs attention to painting that area.
That might sound like a small thing. But when you repeat it across multiple masks and multiple photographs, those saved clicks add up.
Left and Right Brackets: Change Brush Size
Once the brush is active, use the bracket keys to change its size:
- [ makes the brush smaller.
- ] makes the brush larger.
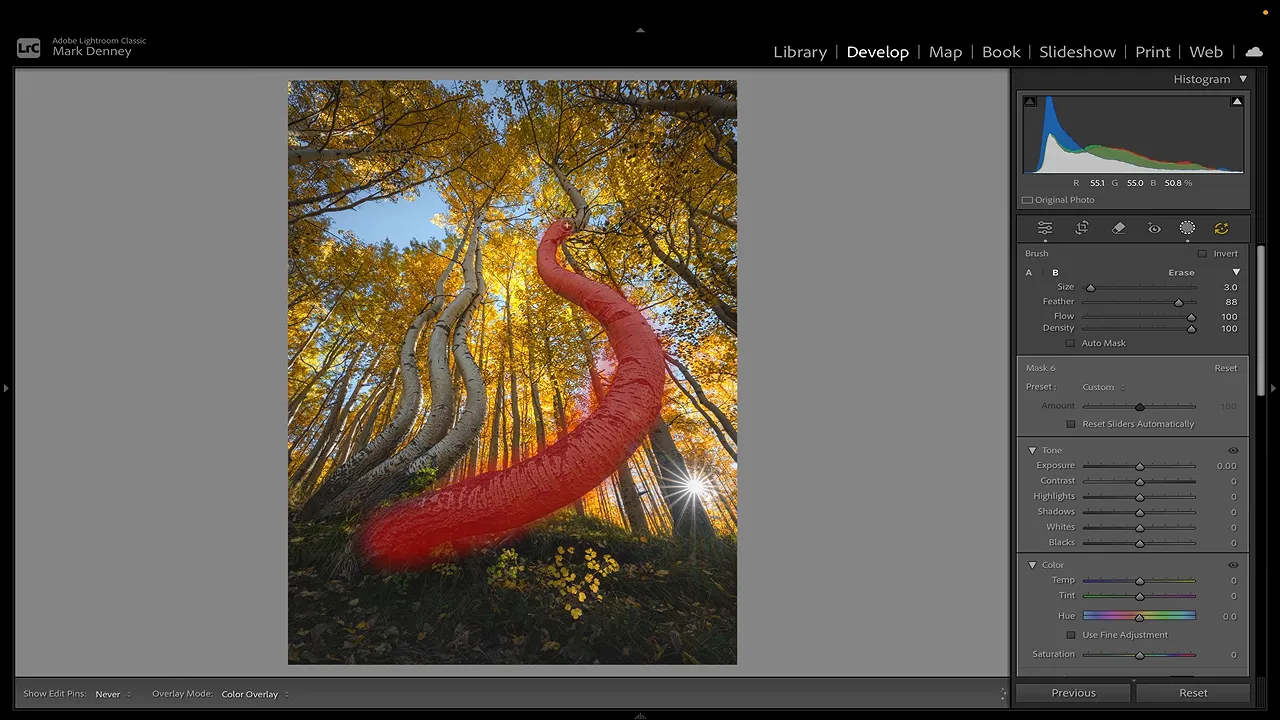
In the aspen photograph, I can start with a larger brush along the broad lower section of the curved trunk. As I move upward and the trunk narrows, I tap the left bracket key to reduce the brush size.
There’s no need to keep traveling back to the Size slider. My attention stays on the shape I’m trying to follow.
Shift + Brackets: Change Brush Feathering
This is one I discovered a few years ago, and I’ve used it constantly ever since. Hold Shift while pressing the bracket keys to adjust feathering:
- Shift + [ decreases feathering for a harder edge.
- Shift + ] increases feathering for a softer edge.
Brush size controls how large an area you’re painting. Feathering controls how gradually that brush fades at its edge. Having both adjustments available under your fingers makes it much easier to adapt the brush as you work.
The combination is what makes this so useful: press K, choose your size with the brackets, adjust the feather with Shift and the brackets, and keep painting.
O: Show or Hide the Mask Overlay
Press O to toggle the selected mask’s overlay. It gives you a clear way to check exactly where the mask is covering the photograph.
For example, I can check the mask around the sunlight coming through the trees, then hide the overlay again to judge the actual adjustment.
The important distinction is that O changes the visibility of the overlay, not whether the adjustment itself is enabled. Use it to inspect coverage, then get the colored overlay out of the way when you want to evaluate the image.
Jump Straight to Linear and Radial Gradients
The Brush isn’t the only masking tool you can access directly. Linear and Radial Gradients have shortcuts, too, and they remove the same repeated trip through the masking menus.
M: Create a Linear Gradient
Press M to activate a new Linear Gradient. You don’t have to open the Masking panel first. From the Basic panel, you can press M and then click and drag across the photograph to place the gradient.
In the aspen image, I can drag upward from the bottom to create a graduated selection across the foreground. I can just as easily place one from the top when that’s the area I want to work on.
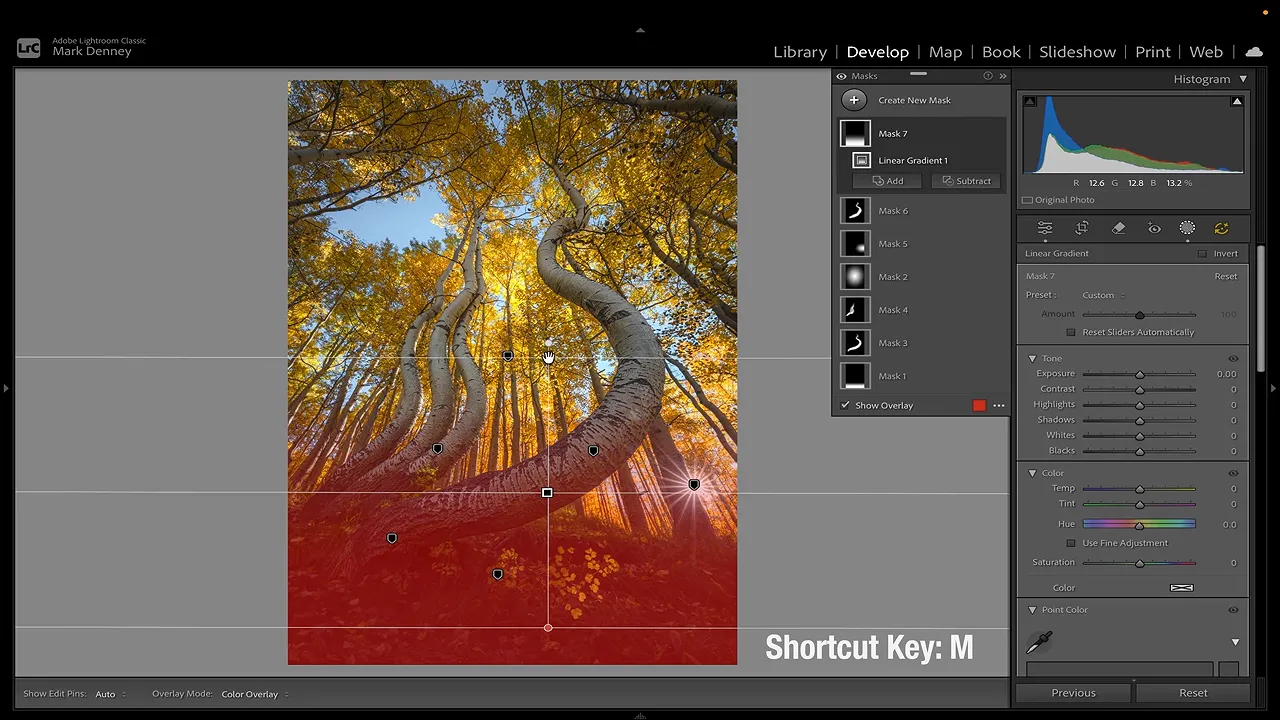
The shortcut activates the tool. You still choose the gradient’s position and extent by drawing it on the image.
Shift + M: Create a Radial Gradient
The Radial Gradient is probably the mask I use most often. Press Shift + M to activate it, then click and drag to draw the selection where you need it.
Again, you can do this directly from the Basic panel. There’s no need to open Masking, click the plus button, and choose Radial Gradient from the list.
These three shortcuts make a very useful group to learn together:
- K: Brush.
- M: Linear Gradient.
- Shift + M: Radial Gradient.
Command + Z or Ctrl + Z: Undo
I use Undo constantly while editing. On a Mac, that’s Command + Z. On Windows, it’s Ctrl + Z.
If I place a gradient and want to try it again, I can undo that step immediately. It’s a simple shortcut, but it belongs alongside the masking tools because it makes trying an adjustment and backing out of it so easy.
Reach the Everyday Editing Tools Faster
Some shortcuts are especially useful because they handle things you do over and over: checking a detail, refining a crop, or selecting a white balance reference.
Z: Zoom In and Back Out
I’ve become much better about not pixel peeping, but I still need to inspect details during an edit.
Instead of pinching on a trackpad or heading over to the zoom controls, press Z to toggle between the fitted image and a zoomed-in view. Move around the image to inspect what you need, then press Z again to return to the overall photograph.
I like how quickly this lets me check a detail and get back to evaluating the composition. Zooming in is useful, but I don’t want navigating the zoom controls to interrupt the edit.
R: Open the Crop Tool
I crop almost every photograph in some way. Sometimes it’s a significant change. Other times, I’m only removing a tiny amount from an edge.
Press R to open the Crop tool. In this photograph, I use it to bring the bottom edge up slightly and trim a little from the top.
Whether the crop is dramatic or barely noticeable, the shortcut gets me straight to the tool instead of searching for its icon.
W: Activate the White Balance Eyedropper
Press W to bring up the White Balance eyedropper. Then select an area in the photograph that should be neutral to have Lightroom adjust the white balance from that sample.
The shortcut only gets the eyedropper ready. You still need to choose the reference point thoughtfully. That’s the part that deserves your attention, not locating the tool in the panel.
Check Highlight and Shadow Clipping With J
Press J to toggle the clipping indicators. These colored warnings help you identify areas reaching the extremes of the image’s tonal range:
- Red indicates clipped highlights.
- Blue indicates clipped shadows.
In the aspen photograph, a small red warning appears in a bright area near the curved trunk. Bringing down the Highlights slider clears that warning in this example.
Being able to switch the indicators on and off is handy. I can check the bright areas, make an adjustment, and then remove the warnings so I can judge the photograph without the extra colors competing for my attention.
Think of J as a quick diagnostic check during the edit. It gives you information about the image while keeping the process simple.
Review Where the Edit Started and Where It Is Now
Some of my favorite Lightroom shortcuts aren’t for changing the photograph at all. They’re for evaluating what I’ve already done.
It’s incredibly useful to step back and see where an image began, how far I’ve pushed it, and whether I like the direction.
Backslash: Toggle Before and After
Press the backslash key (\) to switch between Before and After. In this edit, Before shows the starting raw appearance, while After shows the photograph with my current adjustments.
That quick switch makes the overall change easy to see. I can move between the darker starting image and the developed version without opening another panel or changing tools.
Y: Compare Before and After Side by Side
Press Y to open a side-by-side Before/After comparison. In the layout I use here, Before is on the left and After is on the right.
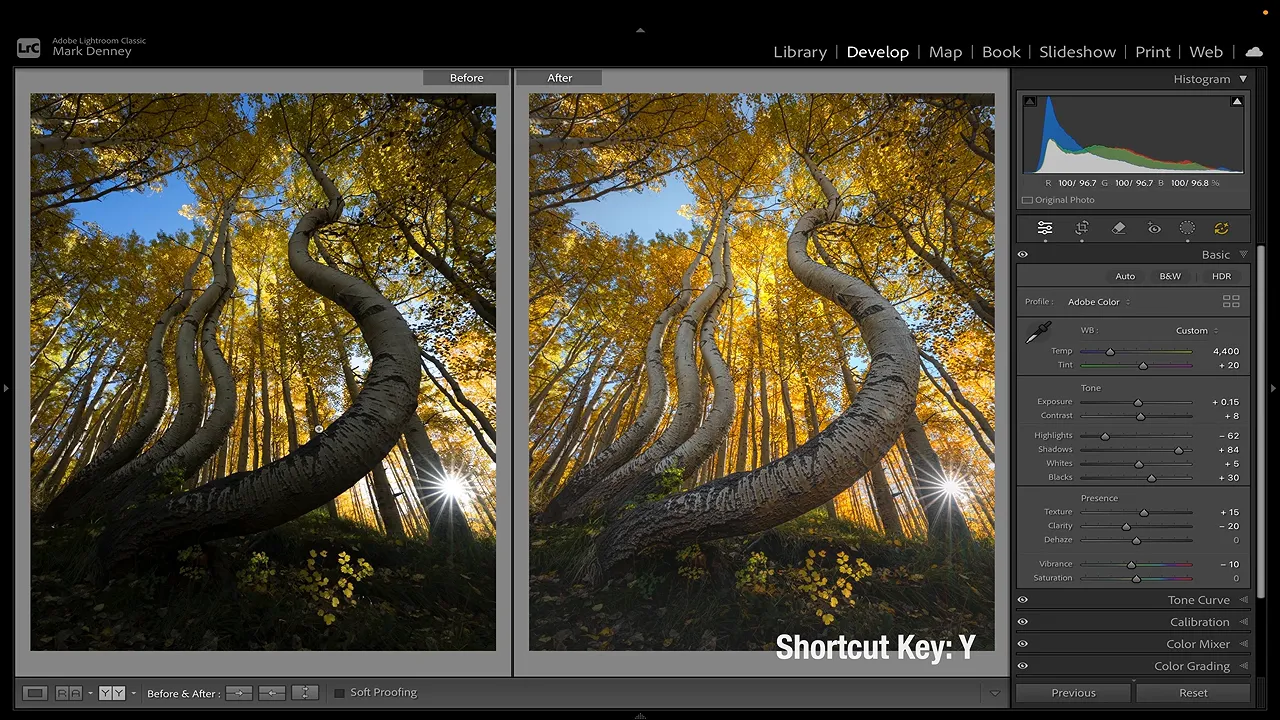
I use both comparison methods on every photograph. Backslash is great for quickly flipping between the two states. Y is useful when I want to see both versions at the same time.
Press Y again to return to the single-image view.
L: Review the Photograph With Lights Out
Once the photograph is nearly finished, press L to cycle through Lights Out:
- The first press dims the surrounding Lightroom interface.
- The second press turns the surrounding area black.
- The third press restores the normal interface.
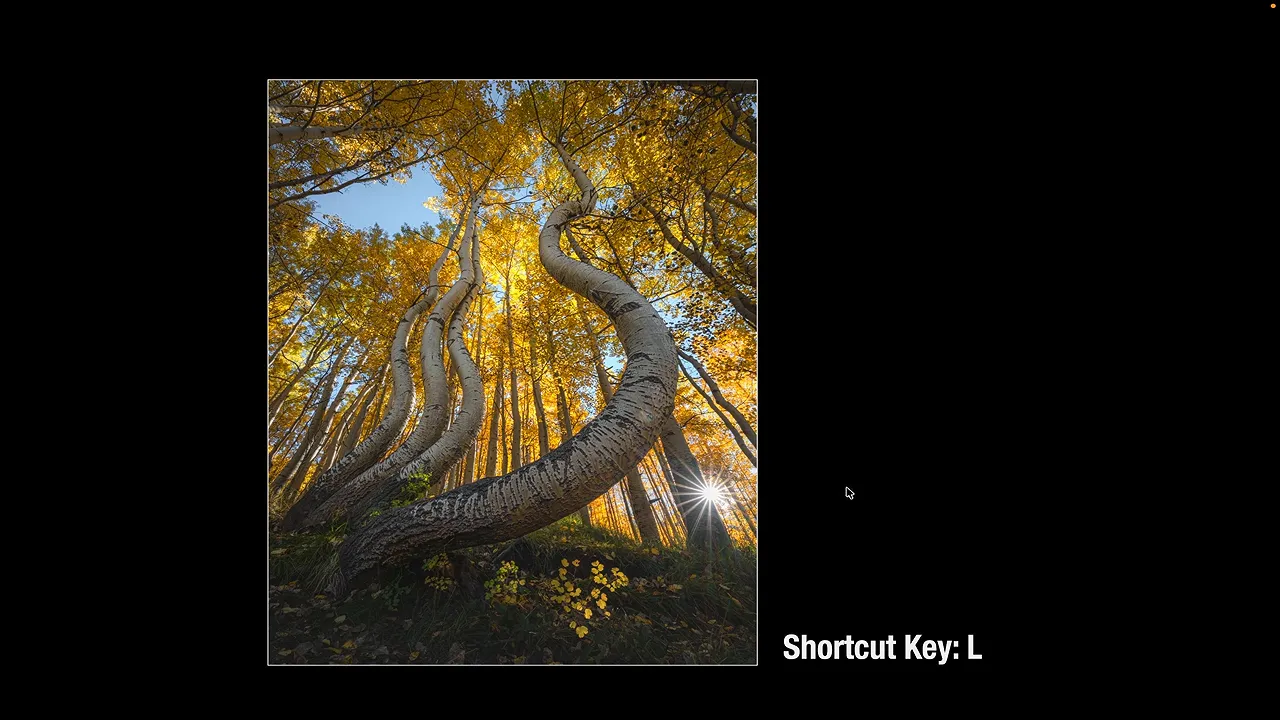
This is such a nice way to review the overall photograph. The panels, sliders, and other distractions disappear, leaving the image as the focus.
At that point, I’m asking whether the photograph is where I want it to be. Does anything still need attention? Do I want to make another change? Removing the interface clutter makes that review much easier.
I: Cycle Through Image Information
Press I to cycle through the image information overlay. In my setup, one view displays file information such as the filename, capture date and time, and image dimensions. Another shows capture settings, including shutter speed, aperture, ISO, and lens information.
Press I again to hide the overlay.
It’s a convenient way to check those details without leaving the image you’re editing.
Learn the Shortcuts That Fit Your Workflow
At editing retreats and workshops, people will often stop me mid-demonstration to ask how I opened a tool or changed something without clicking on it. Most of the time, the answer is simply a keyboard shortcut.
You don’t need to memorize every Lightroom shortcut. There are far more than most of us will ever use. Even after years of editing, I was surprised by how extensive the list was when I put my guide together. Adobe also maintains a Lightroom Classic keyboard shortcut reference if you want to explore further.
Start with a few shortcuts that match the way you already edit. If you use masks frequently, learn K, the bracket keys, Shift + brackets, and O. If you’re refining and reviewing an image, start with R, backslash, Y, and L.
Over time, you’ll find your own set of 10 or 15 that you reach for without thinking. That’s when the benefit becomes really noticeable. You’re no longer pausing to remember where a tool lives. You’re simply making the adjustment and staying focused on the photograph.
I’ve put together a free Lightroom Shortcut Guide with these shortcuts and a broader reference for both Mac and Windows. Keep it beside you during your next edit and build the habit a few keys at a time.


