There’s nothing quite like heading home from a photography trip knowing you captured something special. The conditions were incredible, the composition came together, and you can’t wait to see that photograph on a bigger display.
Then you get home, zoom in, and realize it’s soft. What looked like a potential favorite on the back of the camera hasn’t held up.
It’s easy to start questioning your equipment. Is something wrong with the camera body? Is the lens not sharp enough? Before you go down that road, check your settings and shooting technique. More often than not, the problem is something much simpler.
These are six common reasons your photos aren’t as sharp as you expect, particularly in landscape photography. They aren’t ranked in order of importance, although the last one took me the longest to recognize in my own work.
Key Takeaways
- Soft photos can result from focus settings, lost fine detail, or camera movement.
- Match handheld shutter speed to focal length and support the camera steadily.
- Test your lenses to find sharp apertures rather than assuming smaller openings are always better.
- Remove loose straps and use a shutter delay to reduce movement during tripod exposures.
Table of Contents
- 1. You’re Using the Wrong Autofocus Mode
- 2. Extremely High ISO Is Hiding Fine Detail
- 3. Your Shutter Speed Is Too Slow for Handholding
- 4. You Haven’t Found Your Lens’s Sharpest Apertures
- 5. Your Camera Strap Is Moving on the Tripod
- 6. You’re Not Giving the Camera Time to Settle
- Check the Simple Things Before Blaming Your Gear
1. You’re Using the Wrong Autofocus Mode
One of the first things I check is the autofocus mode. Most cameras offer some version of these two options:
- AF-S, or single autofocus: Acquires focus and locks it for the shot.
- AF-C, or continuous autofocus: Continues adjusting focus to follow a moving subject.
Continuous autofocus makes perfect sense for wildlife, sports, or racing cars. When your subject is moving, you want the camera to keep adjusting focus as the distance changes. On some Canon cameras, you’ll see continuous focusing called AI Servo.
With landscape photography, though, the main subject is generally stationary. For that kind of scene, single autofocus is usually my preferred starting point.
Imagine focusing on a tree or a waterfall while a nearby leaf moves in the wind. Depending on your focus area and tracking settings, continuous autofocus may keep searching or shift away from the detail you intended to hold sharp. You established focus, but it may not stay where you expected by the time you make the exposure.
Single autofocus takes that unnecessary adjustment out of the equation. Focus on the detail you want, let the camera lock, and make the photograph. The important thing is matching the autofocus mode to the subject rather than leaving the camera in one mode for everything.
2. Extremely High ISO Is Hiding Fine Detail
A photograph can be correctly focused and still look soft. Extremely high ISO is one reason that happens.
I’m not talking about a setting like ISO 640. I’m talking about pushing into values such as ISO 12,800 or ISO 25,600. Compare those files with an image made at ISO 100, and the difference in fine detail becomes much easier to see.
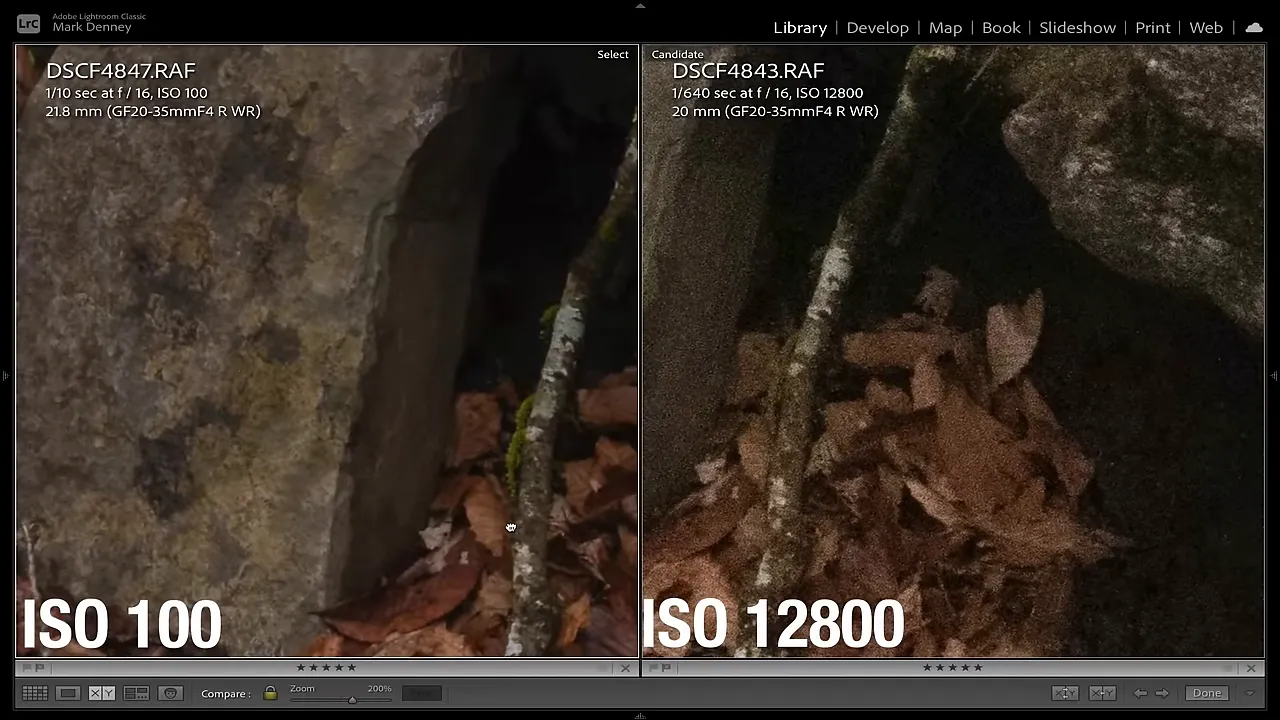
At a smaller display size, both images may seem perfectly acceptable. Zoom into leaves, grass, bark, or other small textures, and the high ISO version can look less defined. That loss of detail can give the impression that focus was missed, even when it wasn’t.
Don’t confuse reduced detail with incorrect focus. If the camera locked focus where you intended but the photograph still looks a little mushy, check the ISO before blaming the autofocus system or lens.
The goal isn’t to become afraid of raising ISO. It’s to recognize that extremely high settings come with an image-quality tradeoff and to avoid using them unnecessarily when fine detail is a priority.
3. Your Shutter Speed Is Too Slow for Handholding
Another very common culprit is subtle camera movement during a handheld exposure. You might not see an obvious streak of blur. Sometimes there’s just enough movement to take the crispness out of the photograph.
A useful starting point is the one-over-focal-length rule: use a shutter speed of roughly one divided by your focal length, or faster.
- At 200mm: Start around 1/200 second or faster.
- At 16mm: The rule points to roughly 1/16 second, using a nearby available shutter speed.
The longer the focal length, the faster the shutter speed you’ll generally need to keep handheld movement from becoming visible. This is a starting guideline, not a guarantee, but it’s an easy habit to remember in the field.
If your camera has in-body image stabilization, or your lens offers optical image stabilization, enabling it can help you work at slower shutter speeds. Even so, I like having that focal-length guideline in mind rather than assuming stabilization will solve everything.
Give the camera a more stable platform
How you hold the camera matters, too. Tucking your elbows into your body gives you a steadier platform than holding them out to the sides.
Another technique is to place your left hand on your right shoulder, then rest the camera on the raised left elbow while operating it with your right hand. It looks a little unusual, but it gives the camera another point of support.
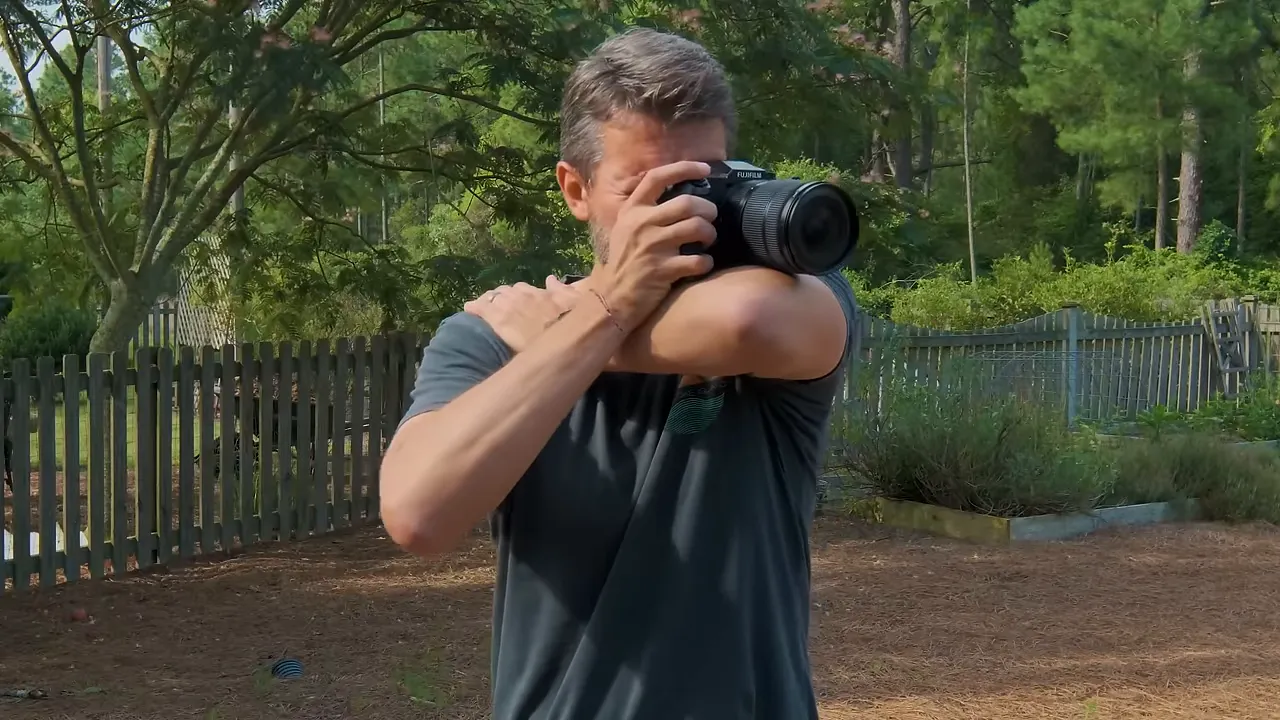
Neither technique replaces an appropriate shutter speed. The best results come from combining a stable hold with a shutter speed suited to the focal length you’re using.
4. You Haven’t Found Your Lens’s Sharpest Apertures
It’s worth getting to know your lenses before you take them somewhere special. Every lens is a little different, and the sharpest aperture isn’t necessarily the widest or the smallest available opening.
As a general starting point, many lenses become sharper when stopped down about one or two stops from wide open. With an f/4 lens, that gives you a useful testing range around f/5.6 to f/8, including intermediate settings such as f/6.3.
At the other end, choosing a very high f-number can soften fine detail through diffraction. I’m cautious about going beyond f/16 or f/18 purely in pursuit of sharpness, particularly into settings such as f/20 or f/22.
That doesn’t mean there’s a universal cutoff where every lens suddenly becomes soft. The practical point is that stopping down farther does not automatically produce a sharper photograph. For a deeper explanation of the optical tradeoff, Cambridge in Colour has a useful guide to diffraction and photography.
Run a simple aperture test at home
Years ago, whenever I got a new lens, I would put an old folding camera on a fence post in my backyard and photograph it at different apertures. Then I’d compare the results in Lightroom.
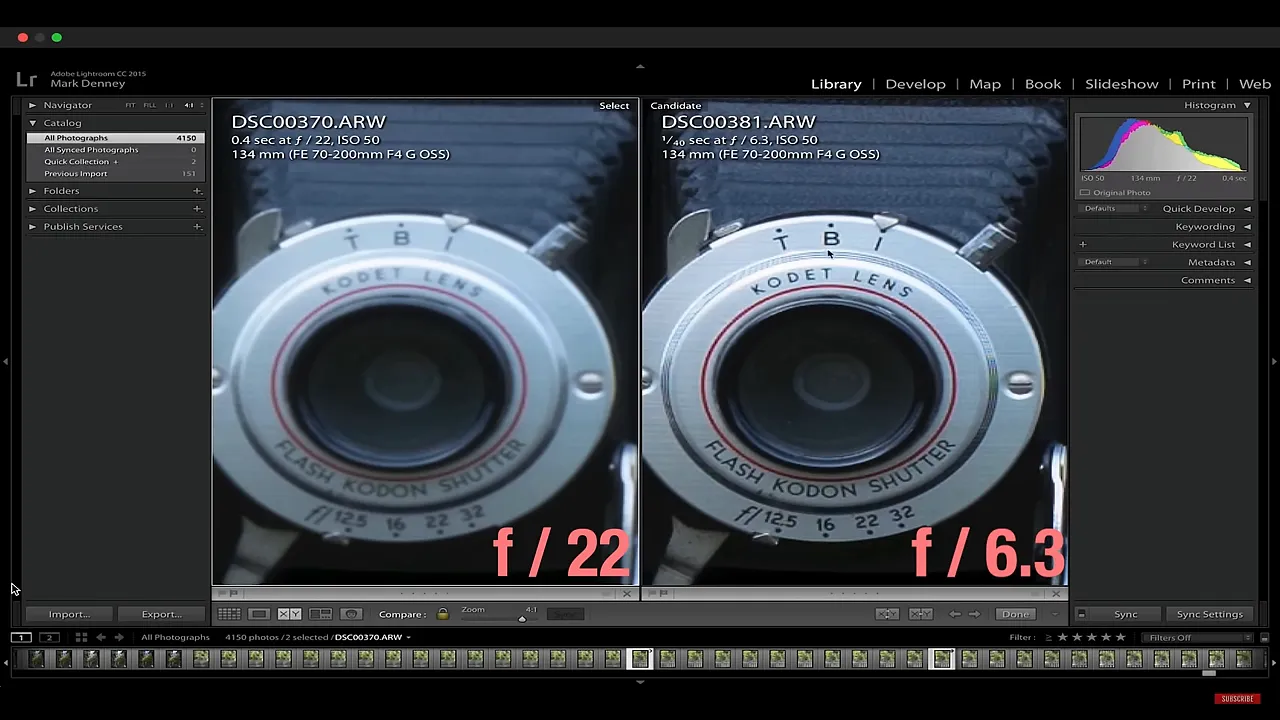
You don’t need an elaborate setup to learn something useful:
- Choose a stationary subject with fine detail.
- Photograph it at a series of different apertures.
- Compare those details closely on a larger display.
- Note which aperture settings produce the sharpest results with that lens.
Test your own equipment rather than relying entirely on a general rule. A little experimentation at home gives you much more confidence when the light and composition finally come together.
5. Your Camera Strap Is Moving on the Tripod
A camera strap is great when you’re handholding. It provides some security, and gently pushing the camera away against a neck strap can add tension that helps steady your hold.
On a tripod, that same strap can become a source of movement.
If the strap is hanging loose and the wind catches it, it can tug on the camera during the exposure. This is especially troublesome at slower shutter speeds, when even a small vibration can soften the photograph.
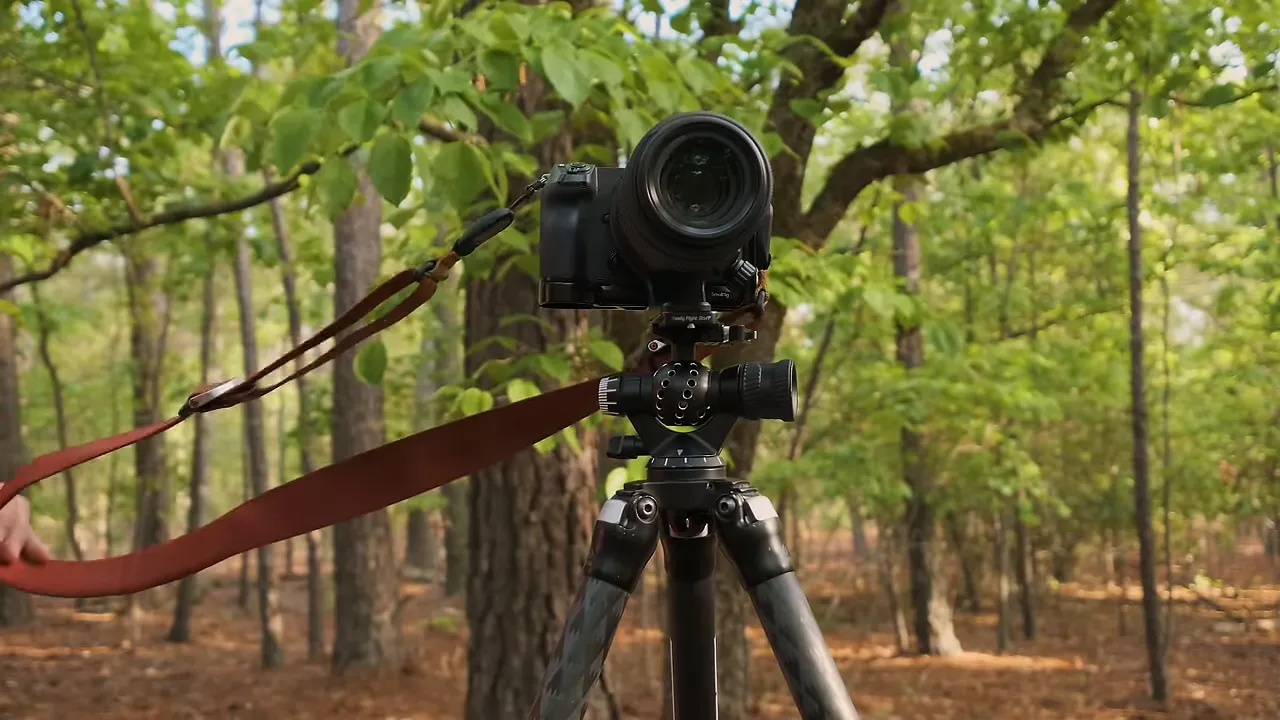
That’s why I remove my camera strap whenever I’m photographing on a tripod. Quick-release strap connectors make the process simple enough that it doesn’t become a chore.
The tripod may be holding the camera, but you still need to eliminate anything that can move it. A dangling strap is an easy detail to overlook when you’re concentrating on the scene.
6. You’re Not Giving the Camera Time to Settle
This is the one that tripped me up for years: pressing the shutter button and immediately starting the exposure.
Even on a tripod, touching the camera introduces a little movement. With a fast shutter speed, that may not cause a noticeable problem. But landscape photography often means working around sunrise or sunset, when the light is dimmer and exposures become longer.
That tiny movement can be enough to spoil the fine detail you expected to capture.
My solution is simple: use the camera’s self-timer to delay the exposure. Press the shutter button, take your hand away, and give the camera time to settle before it records the image.
A remote shutter release is another option, but I prefer not to carry an extra accessory or plug another thing into the camera. I like keeping the process as streamlined as possible.
When I use a two-second or ten-second delay
- Two-second delay: My usual choice when I’m not using a long lens.
- Ten-second delay: My choice with a longer lens, giving the setup more time to settle.
Longer lenses can put more weight out in front of the camera, and they make those tiny jitters more apparent. Giving the setup a little extra settling time is an easy precaution.
You can also reduce movement by gently rolling your finger onto the shutter button instead of jabbing it straight down. But for a static landscape on a tripod, the delay is what takes the pressure off your technique. You press the button, move away, and let the camera stabilize before the exposure begins.
Check the Simple Things Before Blaming Your Gear
Questions about sharpness come up all the time during workshops. Someone makes a photograph, looks at the result, and wonders why it isn’t as crisp as expected.
Before assuming the camera or lens is defective, work through these six checks:
- Does the autofocus mode suit the subject?
- Is an extremely high ISO reducing fine detail?
- Is the shutter speed fast enough for the handheld focal length?
- Are you using an aperture your lens handles well?
- Could a loose strap be moving the tripod-mounted camera?
- Have you allowed the camera to settle before the exposure?
Sharp photos often come down to small, repeatable habits. Match the settings to the situation, get to know your lenses, and remove those little sources of movement. You may already own everything you need to make the sharp photographs you’ve been expecting.


