You’re using a tripod, you have a sharp lens, and you’ve stopped down to f/11. The composition looks good. The exposure looks good. Then you get home, zoom in, and the details that matter are soft.
It’s frustrating, and I struggled with this when I first got started. Before you blame your lens, though, check your autofocus settings. Your camera might be focusing perfectly on something you never intended to be the subject.
For my landscape photography, the fix comes down to two settings: single autofocus and a single focus point. They sound almost identical, but they control two different things. Together, they let me decide exactly where the camera focuses and stop it from continually changing that decision.
Key Takeaways
- Use single autofocus and single-point AF to control focus behavior and target selection independently.
- Choose a deliberate focusing distance instead of letting nearby foreground details attract autofocus.
- Magnify each photograph to check foreground, midground, and background sharpness before leaving the location.
- Use manual refinement and focus peaking when a small adjustment helps improve focus precision.
Table of Contents
- Why Automatic Focus Selection Can Work Against You
- The Two Autofocus Settings I Use for Landscapes
- Where to Place Your Focus Point
- Check Sharpness Before You Leave the Location
- Precise Focus Also Helps When You Want a Soft Foreground
- Fine-Tune Focus With Manual Adjustment and Focus Peaking
- How to Set Up These Focus Settings on a Nikon Z8
- A Simple Routine for More Consistently Sharp Photos
- Sponsor: Squarespace
Why Automatic Focus Selection Can Work Against You
Modern cameras have hundreds of autofocus points. It’s tempting to activate all of them. You paid for those points, so why not use them?
The problem isn’t how many points your camera has. It’s who gets to choose which part of the scene matters.
With an automatic, full-area autofocus setting, you’re handing that choice to the camera. Depending on the camera and its settings, it may favor nearby objects, strong contrast, or movement. Those can all be useful clues for autofocus, but they don’t necessarily identify the best focusing distance for a landscape.
The foreground isn’t always the right place to focus
Consider a scene with vegetation a couple of feet from the camera, a river and an old mill farther away, and autumn trees and mountains in the background. The nearby vegetation gives the autofocus system an obvious target.
If the camera locks onto those plants, they may look wonderfully sharp. But that doesn’t mean the mill, trees, and mountains will fall within the available depth of field. You can end up with a beautifully focused foreground and a disappointingly soft main subject.
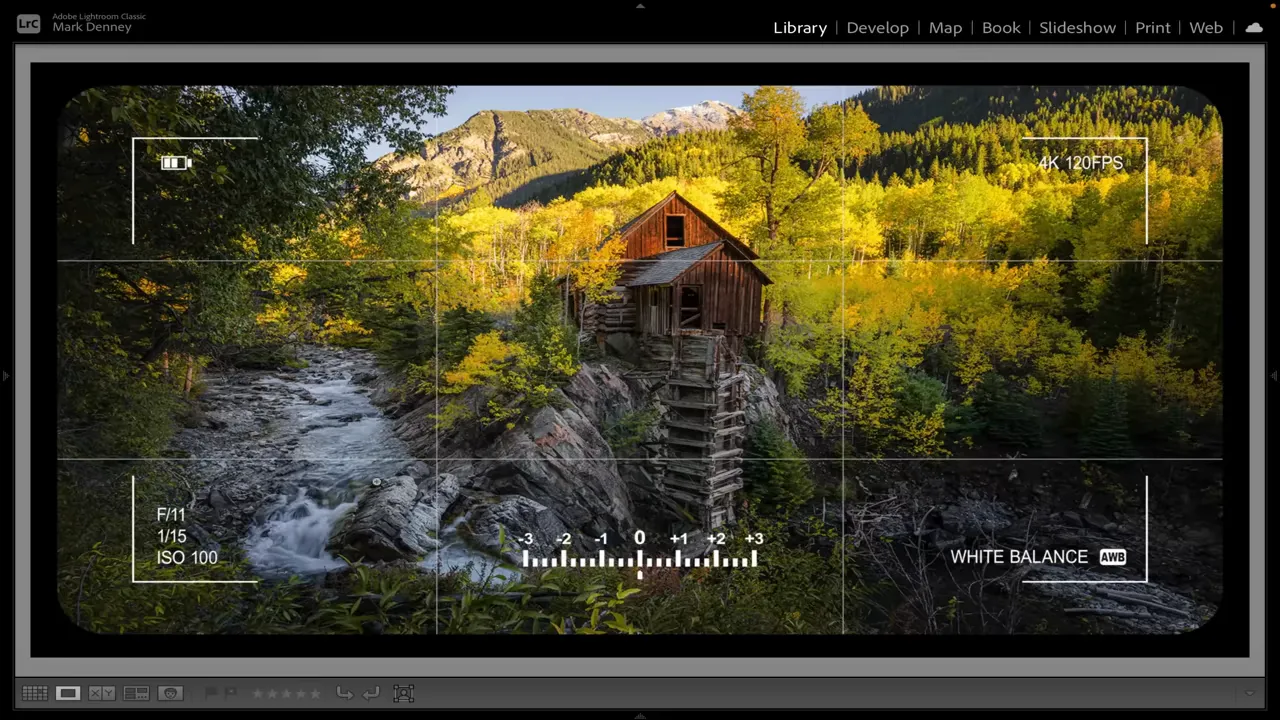
A woodland stream presents a similar problem. Water close to the camera can contain bright highlights, dark shadows, and constant movement. Give the autofocus system the entire frame to search, and that water may become its preferred target, even when focusing farther into the scene would better serve the photograph.
Continuous autofocus adds another variable
Continuous autofocus keeps adjusting focus while autofocus is engaged. That’s valuable when you need to follow a moving subject. But combine it with automatic focus-area selection in a landscape, and the camera may keep reconsidering what it should focus on.
In one scene I photographed in Patagonia, nearby leaves and branches were moving in the wind. There were also rocks and other foreground details at different distances. With a wide automatic focus area and continuous autofocus, those elements gave the camera plenty of opportunities to shift attention away from where I wanted it.
Most of the time, I want a landscape to look acceptably sharp from the foreground through the background. Not every scene calls for that, and a little focus falloff can be fine. But getting that result consistently is much harder when I don’t control the focusing distance.
The Two Autofocus Settings I Use for Landscapes
The important distinction is this: focus mode controls how focus behaves; AF-area mode controls where the camera looks for focus. Changing only one leaves half the decision unresolved.
1. Choose single autofocus
For a stationary landscape, I switch from continuous autofocus to single autofocus. On my Nikon Z8, that means changing AF-C to AF-S. Other camera brands may call the equivalent mode single AF or One-Shot AF.
Single autofocus acquires focus and locks it rather than continually adjusting while the focus command remains engaged. When I want the camera to focus again, I initiate autofocus again.
That gives me a predictable starting point. Once I’ve focused on the intended part of the landscape, a nearby moving leaf doesn’t need to become a reason for the camera to reconsider the entire scene.
2. Choose a single focus point
Next, I change the AF-area mode from an automatic, broad selection to single-point AF.
This gives me a small focusing area that I can move around the composition. Instead of asking the camera to decide what matters, I place that point precisely where I want it to focus.
I prefer the standard single-point option rather than pinpoint AF. On my camera, pinpoint is smaller than I generally need. A normal single point gives me the control I want without making the target area unnecessarily tiny.
- Single autofocus: Acquire and lock focus rather than continuously adjusting it.
- Single-point AF: Use the small area I select instead of choosing a target across the whole frame.
That combination is the foundation of my landscape focusing workflow, whether I’m photographing a wide vista or a tighter telephoto composition.
Where to Place Your Focus Point
Taking control of the focus point leads to the next question: where should it go?
A useful starting point is roughly one-third of the way into the scene, particularly when I’m working around f/11 to f/16 and there isn’t anything extremely close to the camera.
If the nearest important foreground detail is several feet away, perhaps three, four, or five feet or more, that approach can work well. But it’s a rule of thumb, not a guarantee. The scene still needs to be checked.
A mountain reflection example
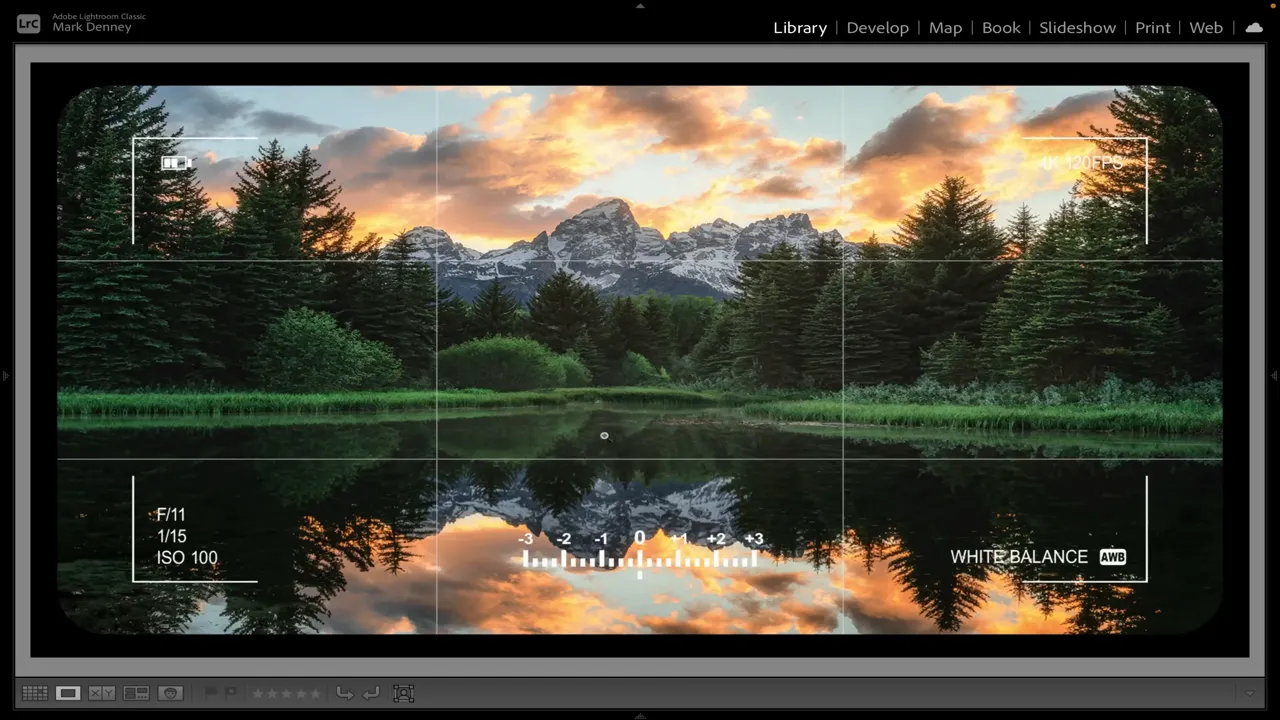
In a mountain-and-lake composition, there was plenty of contrast in the reflection near the bottom of the frame. Automatic focus selection could easily have been drawn there.
Instead, I chose a focus position roughly a third of the way into the composition, around where the reflection began. That gave me the result I wanted across the reflected mountains, the land and trees, and the actual mountains in the distance.
A stream in the Smokies
During a workshop in the Smokies, I photographed a stream framed by bright green foliage. Some leaves were substantially closer to the camera than the rocks and trees farther into the composition.
Rather than letting autofocus grab those leaves, I moved my single focus point onto a rock roughly a third of the way into the scene. I focused once and made the photograph at f/11. That placement gave me sharp foreground rocks and the background detail I wanted.
The important part isn’t memorizing a fixed position in the frame. It’s choosing a focusing distance that serves the depth of the scene, then confirming that it worked.
Check Sharpness Before You Leave the Location
One of the biggest mistakes I see in the field has nothing to do with an obscure menu setting. It’s simply not reviewing the photograph closely enough after taking it.
A small image on the rear LCD can look great even when an important part of it is soft. Take the photograph, review it, and zoom in.
When I talk about checking critical focus areas, I’m not primarily talking about the left and right sides of the frame. I’m talking about the different distances represented in the picture:
- Foreground: Check the nearest detail you intend to keep sharp.
- Midground: Check the main subject or another important feature farther into the scene.
- Background: Check distant trees, mountains, or other details that matter to the composition.
In many landscapes, that means moving from the bottom of the image toward the top. The real goal, though, is to inspect near, middle, and far distances.
If the foreground is sharp but the background is softer than you want, reconsider the focus placement or whether you need a smaller aperture, meaning a higher f-number. If the background is sharp and the foreground is soft, make the same assessment in the other direction.
Then take another photograph and check again. Finding the problem while you’re standing beside the stream is useful. Finding it later in the digital darkroom is just frustrating.
Precise Focus Also Helps When You Want a Soft Foreground
Controlling focus isn’t always about making everything sharp. Sometimes the goal is to keep distracting foreground elements soft while making the subject stand out.
I ran into exactly that situation photographing a black bear in a tree in the Smokies. I was shooting through an opening in the leaves. Even with continuous autofocus, all focus points available, and animal detection enabled, my Z8 struggled to stay on the bear.
It kept picking up nearby leaves or a tree trunk instead.
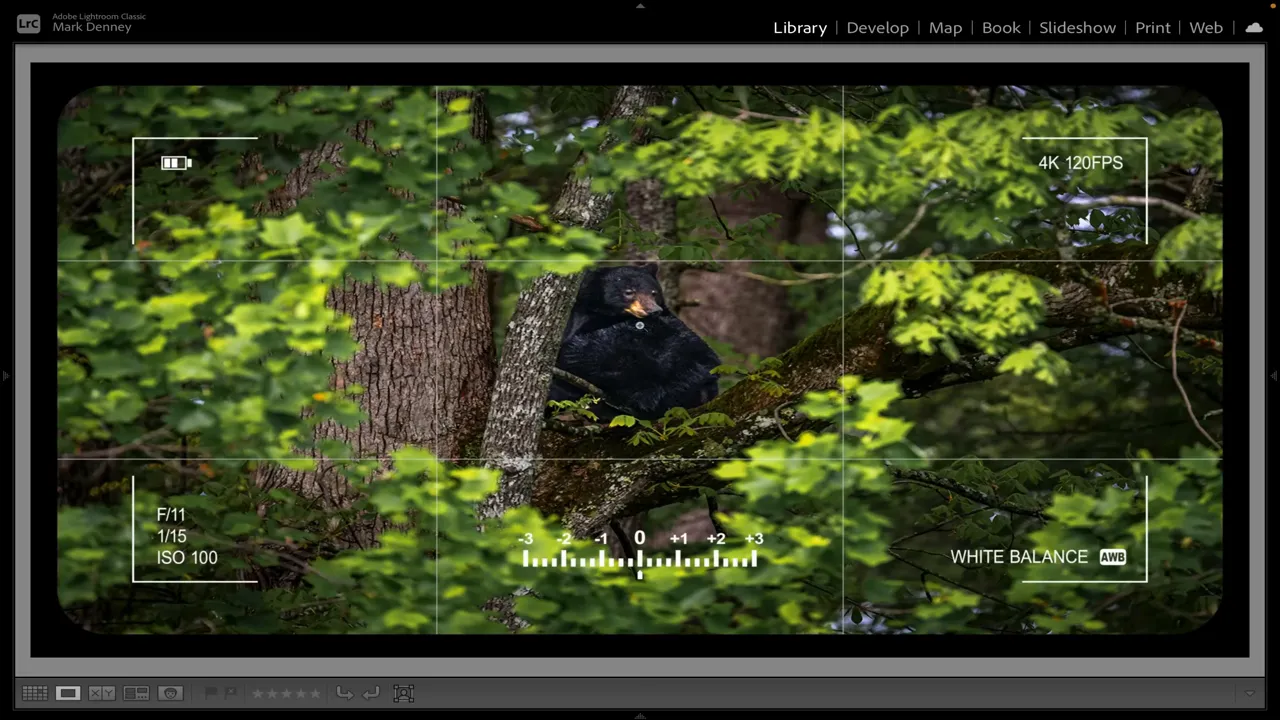
The bear was sitting still, so I switched to a small single focus point and placed it directly on the animal. That gave me a sharp bear and tree while leaving the surrounding foreground foliage softly out of focus.
This isn’t a recommendation to abandon continuous autofocus for moving wildlife. It’s an example of why choosing the target yourself can solve a difficult focusing situation when the subject is stationary.
Fine-Tune Focus With Manual Adjustment and Focus Peaking
There’s one more technique I use when I want to refine focus a little further: let autofocus do most of the work, then make a very small manual adjustment.
Modern autofocus systems are incredible. I think of them as doing about 95 percent of the heavy lifting in this workflow. In some situations, a tiny turn of the focus ring helps me dial in the result.
With the appropriate camera and lens settings enabled, turning the focus ring after autofocusing allows manual refinement and brings up focus peaking. This overlays a color on edges the camera identifies as being in focus.
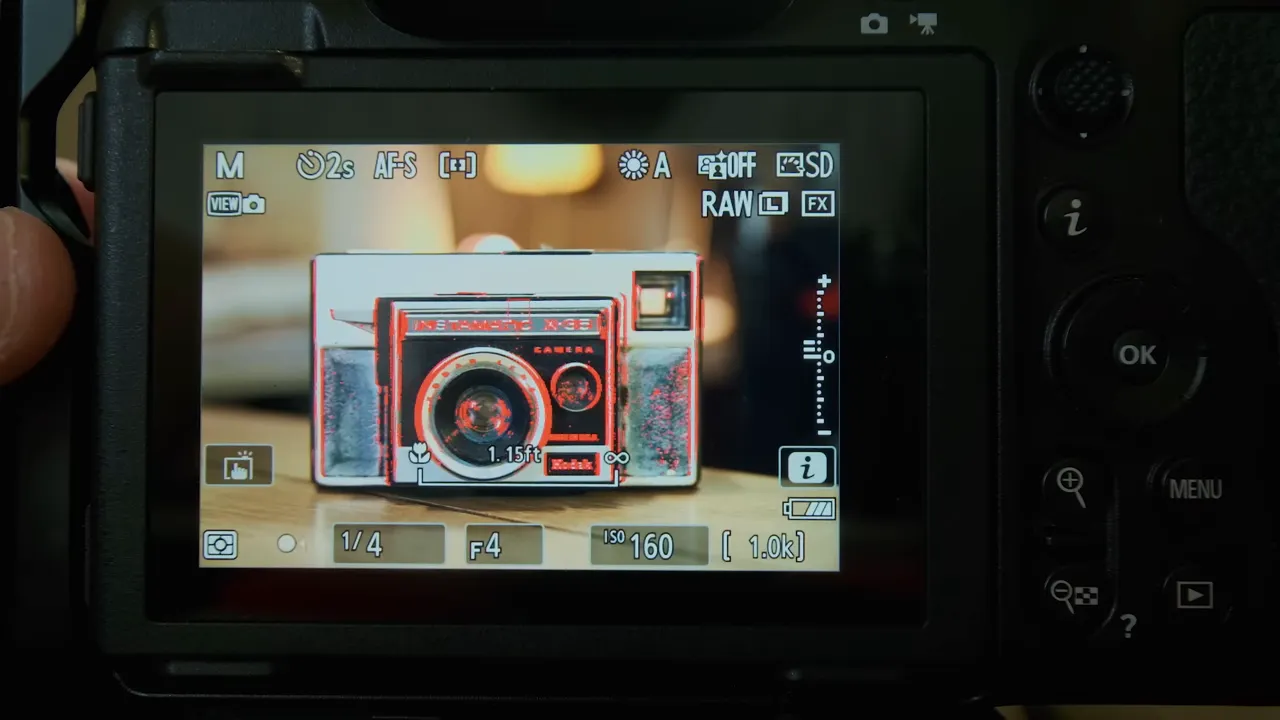
I use red because it’s easy for my eyes to see. As I make tiny adjustments, I look at how the highlighted edges change around the detail I care about.
Think of peaking as a focusing aid, not a replacement for inspecting the finished photograph. You don’t need to make a manual adjustment every time, either. It’s an optional refinement when it helps, not another step to force into every exposure.
How to Set Up These Focus Settings on a Nikon Z8
Menu names vary between cameras, but the settings you’re looking for serve the same purposes. Here’s how I set them up on my Nikon Z8.
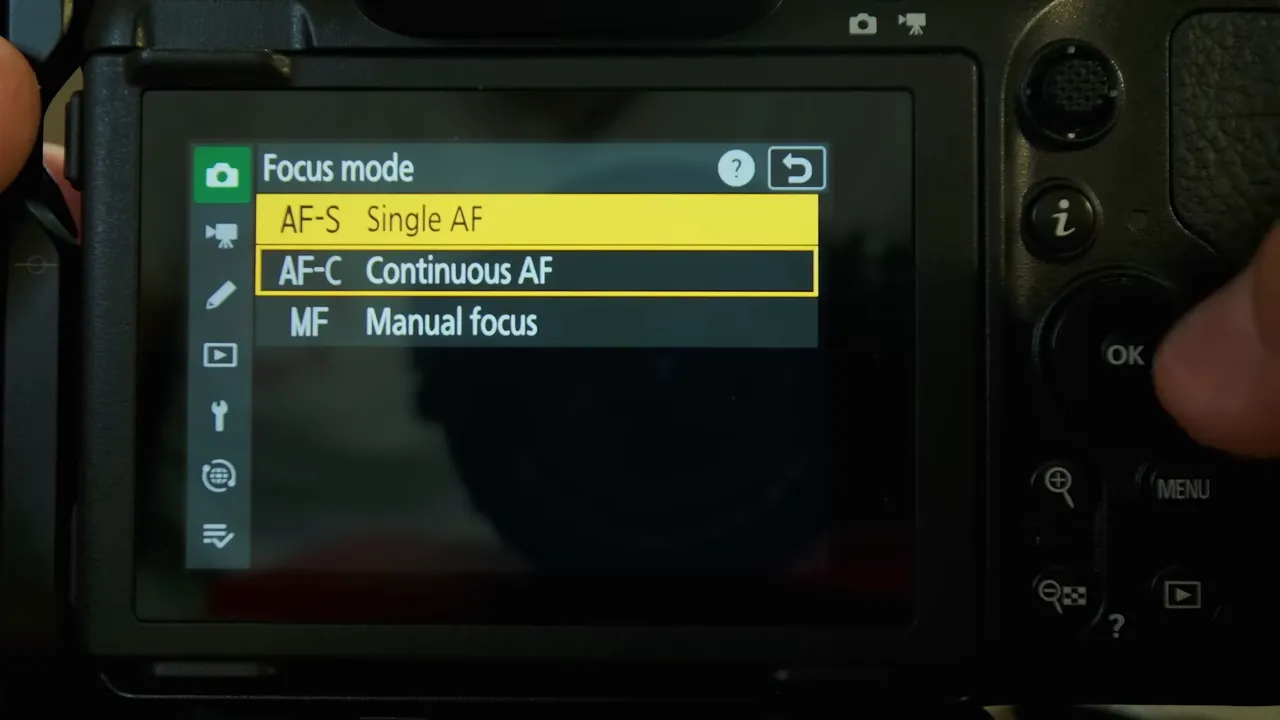
Set the focus mode to AF-S
- Open the Photo Shooting Menu.
- Select Focus mode.
- Choose AF-S, Single AF rather than AF-C, Continuous AF.
Set the AF-area mode to single-point AF
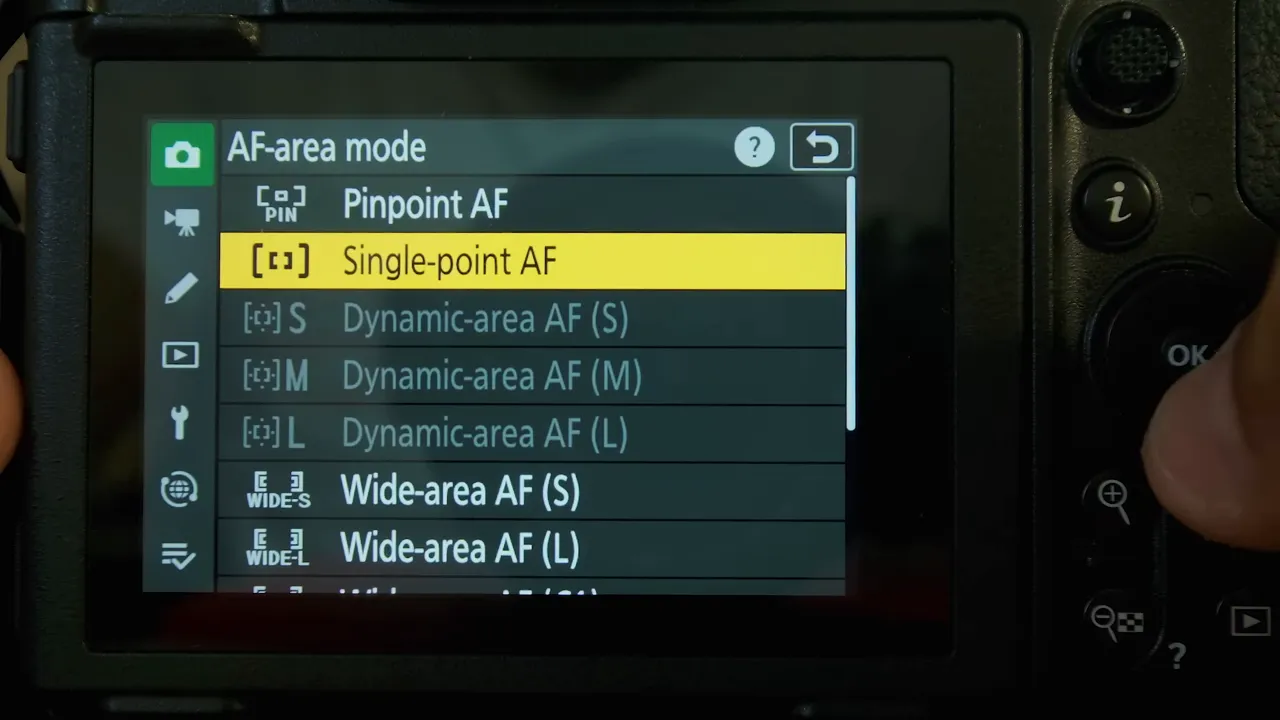
- Return to the Photo Shooting Menu.
- Open AF-area mode.
- Select Single-point AF.
You’ll see several alternatives, including wider focus areas, automatic selection, and pinpoint AF. My preference for this workflow is the standard single-point option.
Enable focus peaking and manual focus override
- Open the Custom Settings Menu.
- Go to the Focus section.
- Open Focus peaking and turn Focus peaking display on.
- Choose a highlight color you can see clearly. I leave mine on red.
- Enable Manual focus ring in AF mode so you can refine focus with the lens ring after autofocusing.
That last setting is easy to overlook. Focus peaking alone doesn’t establish the whole workflow. You also need the ability to adjust focus manually while using autofocus, with a compatible lens and camera configuration.
If your menu labels differ, consult your camera’s manual. Nikon owners can find model-specific documentation through the Nikon Download Center.
A Simple Routine for More Consistently Sharp Photos
Once these settings become familiar, focusing doesn’t need to feel complicated. My routine is straightforward:
- Use single autofocus with a single focus point for the stationary landscape.
- Move the point to a deliberate focusing distance.
- Acquire focus and refine manually if needed.
- Make the photograph.
- Magnify the image and check foreground, midground, and background sharpness.
- Adjust and repeat if an important area is soft.
I used to spend a lot of time wondering why my photographs weren’t as sharp as I thought they should be. Taking control of these settings removed a huge amount of that uncertainty.
Let the camera handle the mechanics of focusing, but don’t let it decide what matters in your photograph.
Sponsor: Squarespace
Thanks to Squarespace for sponsoring this guide. I use Squarespace for my website and e-commerce needs. Its Blueprint AI design system helps with building a photography website, while built-in SEO tools and online-store features support showcasing work and selling physical goods, digital content, or services.
If you’re starting a website or upgrading an existing one, the offer includes a free trial and 10% off your first purchase of a website or domain.


