For a long time, I believed experience alone would make me a better photographer. If I kept shooting, kept editing, and kept showing up, surely my photographs would naturally improve.
After more than a decade behind the camera, I had to admit something uncomfortable: some of the habits that helped me early on had become the same habits holding me back.
They weren’t obvious mistakes. That was what made them so difficult to recognize. They produced results I liked, and they worked just well enough to keep me comfortable.
Three habits stand out, from the way I approached landscape photography in the field to the decisions I made in Lightroom. The last one took me the longest to change, but it also made the biggest difference in my editing.
Key Takeaways
- Work the scene instead of letting fear of missing perfect light lock you into one composition.
- Keep a consistent editing workflow without applying identical adjustments to every photograph.
- Use local adjustments when global sliders improve one area but weaken another.
3. Waiting for Perfect Light Instead of Working the Scene
I used to come home from a photography trip with an SD card full of almost identical compositions. A waterfall photograph repeated again and again. A slightly different moment, perhaps, but essentially the same image.
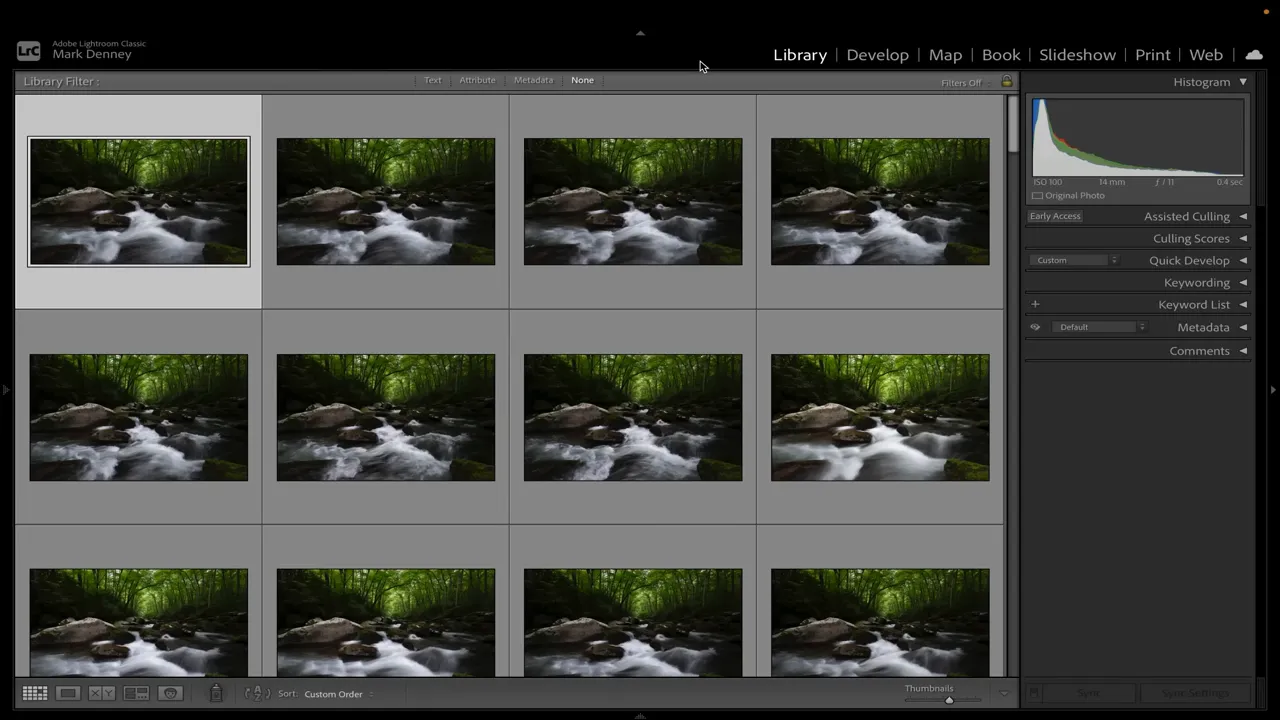
The problem wasn’t that I couldn’t find a composition. It was that once I found one I really liked, I became afraid to leave it.
I would lock down the tripod, refine the framing, get everything settled, and wait. Maybe I was hoping for sunrise color, sunset color, or a little fog to drift through. Whatever the conditions, I had convinced myself that this composition deserved the perfect moment.
While I waited, I kept pressing the shutter. Image after image of the same thing, without actually exploring what else was around me.
How fear of missing out kept me in one place
My reasoning felt perfectly sensible at the time. What if I moved to another composition, got everything set up, and then the magical light appeared back at my original spot?
I knew I would feel terrible about missing it. So I stayed put.
That fear of missing out kept my feet planted and my tripod locked in. I wasn’t really working the scene. I was waiting for the scene to reward the decision I had already made.
Eventually, the repetition became impossible to ignore. My files showed how much time I had spent photographing, but very little variation in how I had approached the location.
The change: move more and experiment more
I gradually began moving around, trying other compositions, and exploring instead of simply waiting. That shift sounds small, but it changed the way I used my time in the field.
The goal became working the scene rather than waiting on it.
This doesn’t mean that waiting for good light is always wrong. My problem was allowing the possibility of better light to prevent any further exploration. I had made one composition so precious that I stopped looking for others.
I still catch myself doing this occasionally. The difference now is that I recognize the pattern much sooner.
2. Applying the Same Lightroom Editing Recipe to Every Photo
Once I started experimenting more in the field, I thought my photography was finally moving forward. In some ways, it was. But another habit was waiting for me when I sat down to edit.
I was processing almost every photograph the same way.
This habit is particularly sneaky because it can grow alongside your knowledge. It doesn’t necessarily begin as a complicated routine. Mine started with just a couple of adjustments, then expanded as I learned more techniques.
My automatic editing routine
Using a photograph from a recent trip to Patagonia, I could easily recreate the sequence I had repeated for years:
- Set Texture to +15.
- Set Clarity to -20.
- Add a vignette of -15.
- Create a large radial gradient across the center and brighten that area.
- Add a linear gradient over the foreground and darken it slightly.
- Add another linear gradient at the top to darken the sky.
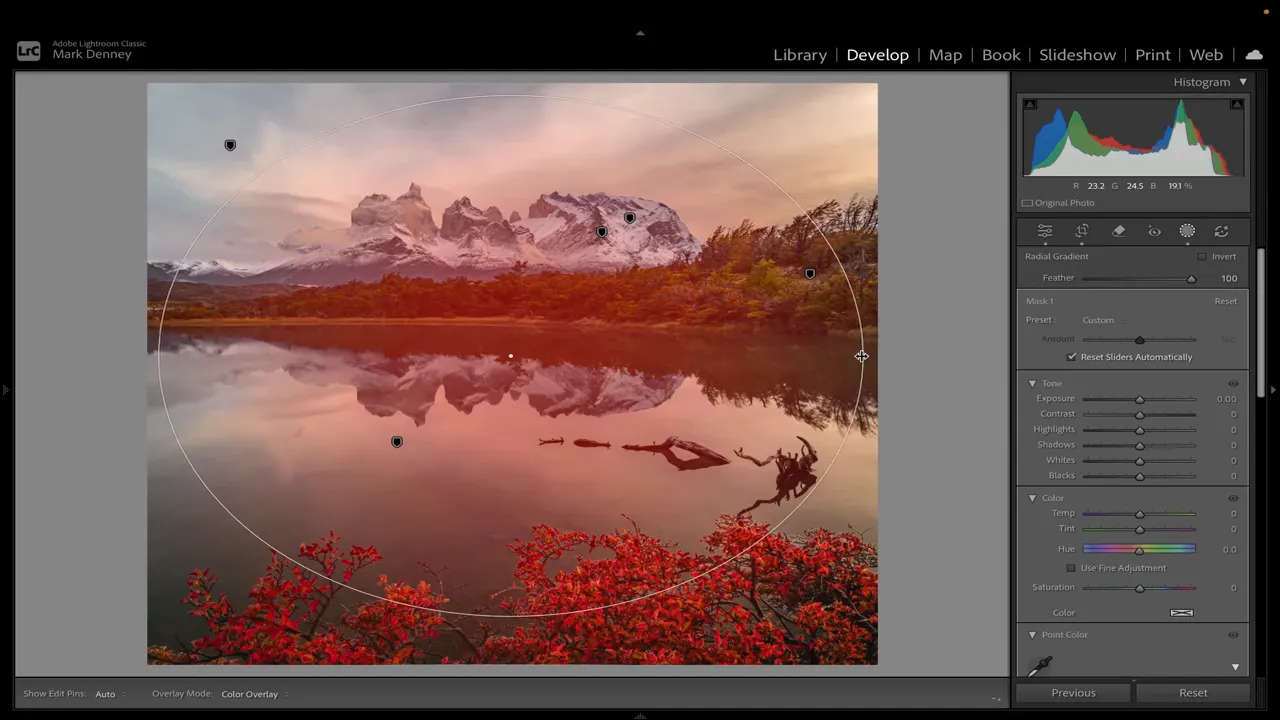
There might have been a few other adjustments, but those steps appeared in every edit. Not just similar techniques, either. I was using the same values and following the same sequence.
At first, it was positive Texture and negative Clarity. Then I added the vignette. Then the brighter center. Then the darker foreground and darker sky, almost like putting a lid on the composition.
Every new technique became another mandatory step. I thought I was improving because my process was becoming more sophisticated. In reality, I was building a longer recipe.
Why a pleasing result wasn’t enough
The difficult part was that I liked the results. I could toggle the masks off and on, see the difference, and feel good about what I had done.
But when I looked back through photographs on my website and Instagram, I could recognize the same treatment everywhere.
Every photograph is different. The light is different, the composition is different, and the areas that need attention are different. It doesn’t make sense to assume that every image needs exactly the same adjustments at exactly the same strength.
A consistent workflow is useful. An identical recipe for every photograph is something else.
I still use many of these techniques. There is nothing inherently wrong with a vignette, a radial gradient, or a darker foreground. What I try to avoid is beginning an edit with a robotic checklist that makes the decisions before I have really considered the image.
Now, the workflow can remain familiar while the actual adjustments vary. The photograph needs to determine which techniques I use, not the other way around.
1. Using Global Adjustments to Solve Local Problems
For a while, I believed breaking that editing routine would solve the problem. My photographs did improve, but something still wasn’t quite right.
Eventually, I realized the issue wasn’t always which adjustments I was making. It was where I was applying them.
This was the hardest habit for me to recognize: I relied on global adjustments even when different parts of the photograph needed different treatment.
One adjustment, conflicting results
A mountain photograph from Patagonia is a good example. Dark trees frame the scene, with beautiful warm light striking a mountain near the center. That light was the reason I made the photograph, so protecting it mattered more than anything else in the edit.
In Lightroom, holding Shift and double-clicking the Highlights slider gave me a suggested starting value of -88. Doing the same with Shadows produced +73.
Those settings helped some areas. The shadow recovery looked good in the trees on the left. I like retaining a little detail in dark areas, and, where possible, a little color.
But the same shadow adjustment made the right side look far too unnatural. Meanwhile, lowering Highlights improved the sky but took something away from that beautiful light on the mountain.
That was the conflict. The global settings improved one part of the frame while weakening another.
Shadows are supposed to remain somewhat dark. Recovering every bit of detail isn’t necessarily an improvement, especially if it changes the character of the scene.
Step 1: Make gentler global adjustments
Instead of forcing the entire photograph to accept those stronger settings, I backed off:
- Highlights: approximately -55 instead of -88.
- Shadows: approximately +45 instead of +73.
These were values for this particular photograph, not a replacement recipe.
The gentler adjustments made the right side look better and preserved more of the mountain light. But now the trees on the left were a little too dark, and the sky still needed attention.
Rather than pushing the global sliders again, I handled those areas separately.
Step 2: Isolate the trees that need more detail
To brighten only the trees on the left, I combined a linear gradient with Lightroom’s landscape selection:
- Open the Masking panel and create a Linear Gradient.
- Draw the gradient over the trees on the left side of the frame.
- Open the mask’s three-dot menu and choose Intersect Mask With > Select Landscape.
- Select Vegetation and create the mask.
- Use Subtract > Brush to remove any unwanted spill outside the intended area.
The intersection is the important part. Although the Vegetation preview can initially show trees throughout the photograph, the combined mask restricts the selection to vegetation within the linear gradient.
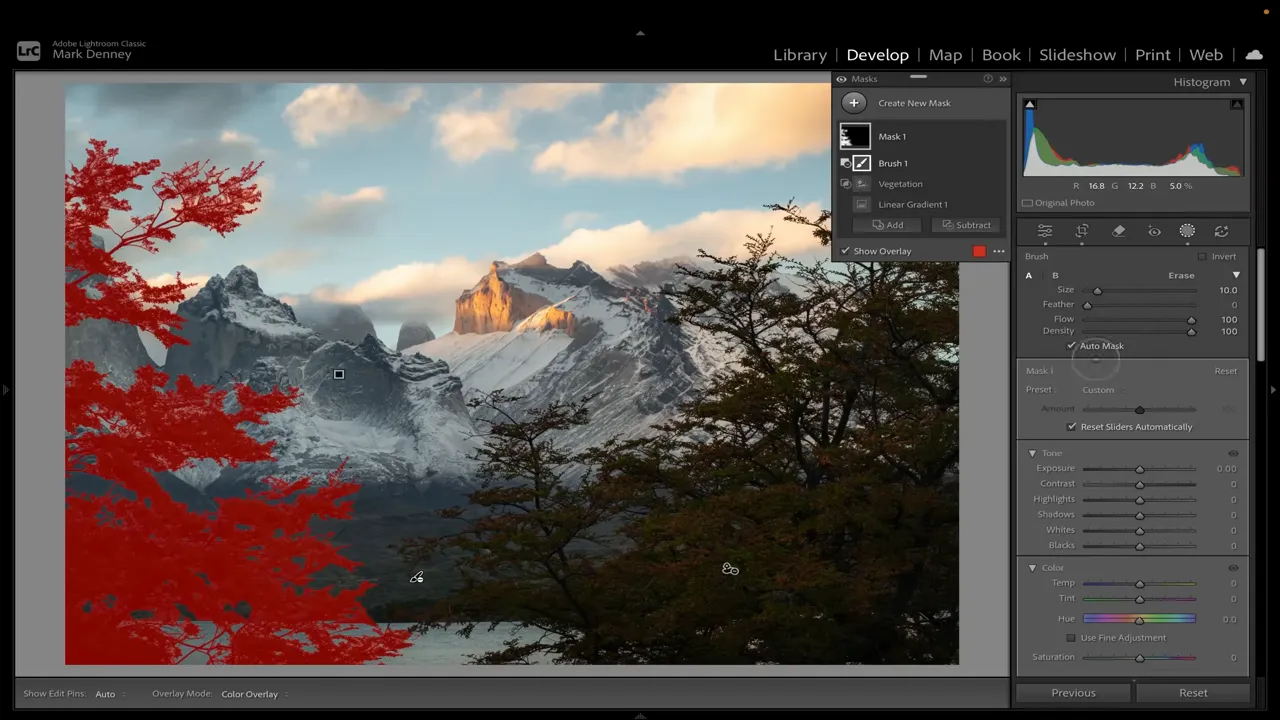
With that area isolated, I could lift the shadows slightly, trying around +20 locally and then judging the result. Even that could be a little too much. I wanted the left side to feel balanced with the right, not obviously brightened.
Toggling the mask off and on helped me evaluate what the adjustment was actually contributing.
For reference on the tools involved, Adobe’s Lightroom Classic masking guide explains how to create and refine local selections.
Step 3: Darken the sky without dulling the mountain light
Next, I created another linear gradient across the top of the photograph.
I had liked the sky when the global Highlights setting was much lower. Now I could work toward that appearance locally without applying the same treatment to the sunlit mountain.
I reduced Exposure a little within the sky mask and lowered Highlights further. I also adjusted the gradient’s position to control how far the effect extended into the frame. A little overlap onto the tops of the trees was acceptable here.
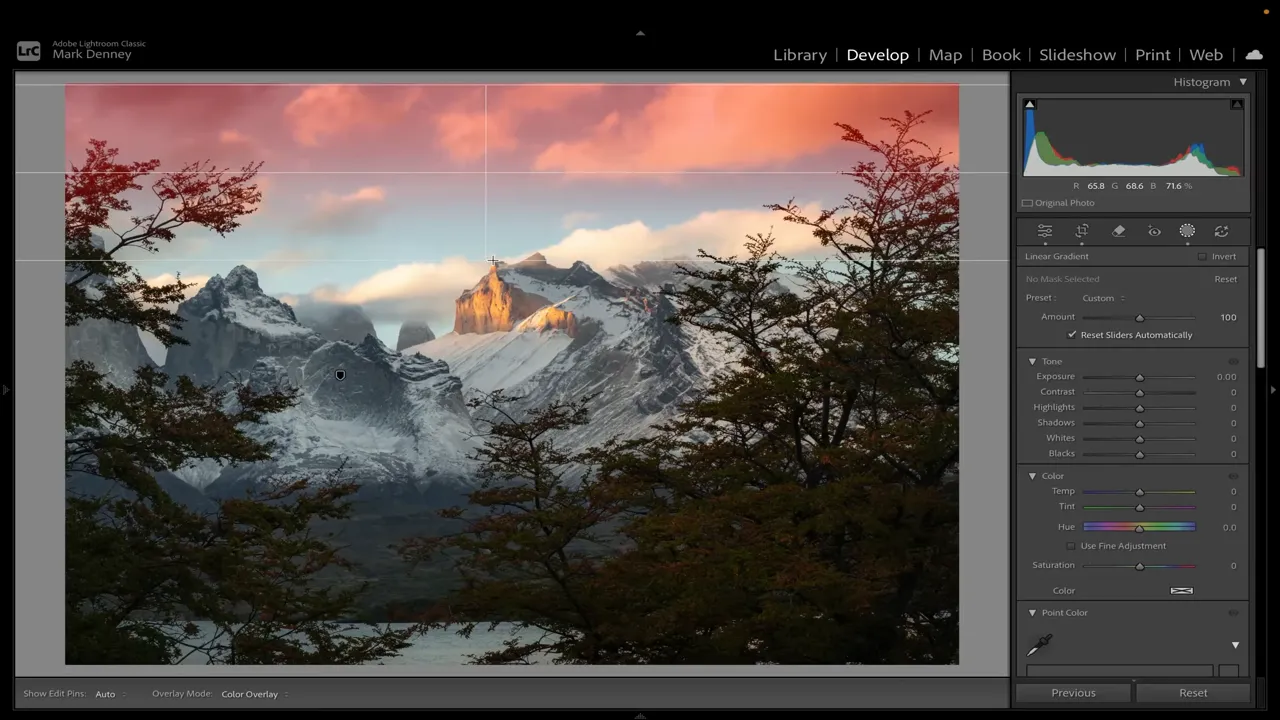
The result was two independent improvements: more detail in the left-side trees and a better-controlled sky. Neither required taking away the light that made the mountain the star of the photograph.
Every area of a photo is not the same, so every area does not need the same treatment.
Moving away from global adjustments for everything and paying attention to individual areas gave my editing a real jump forward. It took me far longer to understand that than I wish it had.
The Hardest Habits to Break Are the Ones That Worked
None of these habits looked particularly harmful while I was doing them. I was being patient in the field. I had a reliable editing process. I was using Lightroom’s sliders to recover detail.
Each approach had helped me at some point. The problem was continuing to rely on it without questioning whether it still served the photograph.
If your landscape photography feels stuck, the answer might not be more gear or better conditions. It might be examining a familiar habit that once helped you but now limits your decisions.
I haven’t completely eliminated these patterns. I still occasionally stay with one composition too long or fall back into a familiar editing move. But I’m much more aware of them now, and I catch myself faster.
That awareness matters. Progress isn’t always about learning another technique. Sometimes it comes from recognizing when to stop repeating one.
Sponsor: Building a Home for Your Photography
Squarespace sponsors this article, and it’s the platform I use for my website and e-commerce needs. Its Blueprint AI design system helps with building a site, while built-in SEO tools and online store features support presenting your photography and selling physical goods, digital content, or services.
If you’re starting a new website or upgrading an existing one, the offer includes a free trial and 10% off your first purchase of a website or domain.


